Docker is an open-source containerization platform that allows you to quickly build, test, and deploy applications as portable containers that can run virtually anywhere. A container represents a runtime for a single application and includes everything the software needs to run.
Docker is an integral part of modern software development and DevOps continuous integration and deployment pipelines.
This tutorial covers how to install Docker on an Ubuntu 20.04 machine.
Docker is available for installation from the standard Ubuntu 20.04 repositories, but it may not always be the latest version. We’ll install the latest Docker package from the official Docker’s repositories.
sudo command (short for Super-user do) is a program designed to allow users to execute commands with the security privileges of another user, by default the root user
Table of Contents
Prerequisites
- You must be registered with Alibaba Cloud.
- You must have added and verified your payment method.
- If you are a new user, after payment method verification you can claim free $450 – $1300 credits. You can register new account and claim your free credits.
- To setup up your ECS for the first time, you can refer to this tutorial or quick-start guide.
- Domain registration is recommended for setting up FQDN hostname of your server. But if you are willing to use IP address directly, you may skip this.
- If you have registered domain with any 3rd party, you may transfer into Alibaba Cloud.
- If you are using the domain name, remember to point your domain name to IP address of your server.
- You should set up your server’s hostname.
- Access to VNC console in your Alibaba Cloud or SSH client installed in your PC.
- Login as root user and create a user with sudo privileges.
Installing Docker on Ubuntu 20.04
Installing Docker on Ubuntu is fairly straightforward. We’ll enable the Docker repository, import the repository GPG key, and install the package.
First, update the packages index and install the dependencies necessary to add a new HTTPS repository:
$ sudo apt update
$ sudo apt install apt-transport-https ca-certificates curl gnupg-agent software-properties-common
Import the repository’s GPG key using the following curl command
$ curl -fsSL https://download.docker.com/linux/ubuntu/gpg | sudo apt-key add -
Add the Docker APT repository to your system:
$ sudo add-apt-repository "deb [arch=amd64] https://download.docker.com/linux/ubuntu $(lsb_release -cs) stable"
Now that the Docker repository is enabled, you can install any Docker version that is available in the repositories.
- To install the latest version of Docker, run the commands below. If you want to install a specific Docker version, skip this step and go to the next one.
- To install a specific version, first list all the available versions in the Docker repository:
$ sudo apt update
$ apt list -a docker-ce
The available Docker versions are printed in the second column. At the time of writing this article, there is only one Docker version (5:19.03.9~3-0~ubuntu-focal) available in the official Docker repositories.
Output

docker-ce/focal 5:19.03.9~3-0~ubuntu-focal amd64
Install a specific version by adding =<VERSION> after the package name:
$ sudo apt install docker-ce=<VERSION> docker-ce-cli=<VERSION> containerd.io
Once the installation is completed, the Docker service will start automatically. You can verify it by typing:
$ sudo systemctl status docker
The output will look something like this:
Output

● docker.service - Docker Application Container Engine
Loaded: loaded (/lib/systemd/system/docker.service; enabled; vendor preset: enabled)
Active: active (running) since Thu 2020-05-21 14:47:34 UTC; 42s ago
...
When a new version of Docker is released, you can update the packages using the standard sudo apt update && sudo apt upgrade procedure.
If you want to prevent the Docker package from being updated, mark it as held back:
$ sudo apt-mark hold docker-ce
Executing Docker Commands as a Non-Root User
By default, only root and user with sudo privileges can execute Docker commands.
To execute Docker commands as non-root user you’ll need to add your user to the docker group that is created during the installation of the Docker CE package. To do that, type in:
$ sudo usermod -aG docker $USER
$USER is an environment variable that holds your username.
Verifying the Installation
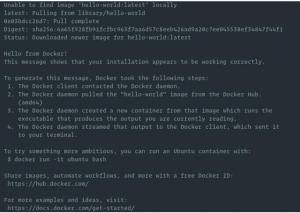
To verify that Docker has been successfully installed and that you can execute the docker command without prepending sudo , we’ll run a test container:
$ docker container run hello-world
The command will download the test image, if not found locally, run it in a container, print a “Hello from Docker” message, and exit. The output should look like the following:

The container will stop after printing the message because it does not have a long-running process.
By default, Docker pulls images from the Docker Hub. It is a cloud-based registry service which among other functionalities, stores the Docker images in public or private repositories.
Uninstalling Docker
Before uninstalling Docker it is a good idea to remove all containers, images, volumes, and networks
Run the following commands to stop all running containers and remove all docker objects:
$ docker container stop $(docker container ls -aq)
$ docker system prune -a --volumes
Conclusion
We’ve shown you how to install Docker on Ubuntu 20.04 machine. To learn more about Docker, check out the official Docker documentation

