WordPress Tutorials [All in 1] Best Series
WordPress Tutorials series will help you in creating and customizing your own WordPress website. Either you are a beginner or expert, these WordPress tutorials will polish your skills. In this series, we will provide you with detailed instructions on how to use WordPress, to create and manage your s

WordPress Tutorials series will help you in creating and customizing your own WordPress website. Either you are a beginner or expert, these WordPress tutorials will polish your skills.
In this series, we will provide you with detailed instructions on how to use WordPress, to create and manage your site. WordPress can be used for both simple and complex websites. In our WordPress tutorial, we have tried to cover all the basics and a few advanced topics. Let’s explore it.
WordPress Tutorials: Basis
What is WordPress?
WordPress (WordPress.org) is a content management system (CMS) based on PHP and MySQL that is usually used with the MySQL or MariaDB database servers but can also use the SQLite database engine. Features include a plugin architecture and a template system, referred to inside WordPress as Themes. WordPress is most associated with blogging (its original purpose when first created) but has evolved to support other types of web content including more traditional mailing lists and forums, media galleries, membership sites, learning management systems (LMS) and online stores. In simple words, WordPress is a factory that makes websites.
Audience
This tutorial has been uploaded for those peoples that have a basic knowledge about CSS and HTML and has an urge to develop websites.
Prerequisites
Before you start this tutorial, we are assuming that you are well aware of the basics of CSS and HTML. If not, then we recommend you to check our short tutorials on these basic courses.
WordPress Tutorials: WordPress Overview
WordPress (WordPress.org) is a content management system (CMS) based on PHP and MySQL that is usually used with the MySQL or MariaDB database servers but can also use the SQLite database engine. Features include a plugin architecture and a template system, referred to inside WordPress as Themes.
What is Content Management System
A content management system (CMS) is a software application that can be used to manage the creation and modification of digital content. It is a software that helps to manage and store all of your digital data like photos, texts, music, documents, etc and is made available on your website. It helps in editing, publishing and modifying the content of the website.
WordPress was initially released on 27th May 2003 by Matt Mullenweg and Mike Little. WordPress was announced as an open-source in October 2009.
Features
WordPress powers more than 34% of the web — a figure that rises every day. Everything from simple websites, to blogs, to complex portals and enterprise websites, and even applications, are built with WordPress.
Here are some of the features that we think that you’ll love.
- SIMPLICITY: Simplicity makes it possible for you to get online and get publishing, quickly.
- FLEXIBILITY: With WordPress, you can create any type of website you want: a personal blog or website, a photo-blog, a business website, a professional portfolio, a government website, a magazine or news website, an online community, even a network of websites. You can make your website beautiful with themes, and extend it with plugins. You can even build your very own application.
- PUBLISH WITH EASE: If you’ve ever created a document, you’re already a whizz at creating content with WordPress. You can create Posts and Pages, format them easily, insert media, and with the click of a button your content is live and on the web.
- SEARCH ENGINE OPTIMIZED: WordPress is optimized for search engines right out of the box. For more fine-grained SEO control, there are plenty of SEO plugins to take care of that for you.
- IMPORTERS: Using a blog or website software that you aren’t happy with? Running your blog on a hosted service that’s about to shut down? WordPress comes with importers for Blogger, LiveJournal, Movable Type, TypePad, Tumblr, and WordPress.
- EXTEND WITH PLUGINS: There are thousands of plugins available at WordPress, that provide custom functions and features, according to the user’s need.
Advantages
- WordPress Is Truly FREE And Open Source.
- Plugins Give You More Functionality.
- The Visual Editor And CMS Are Outstanding.
- It’s Easy To Keep WordPress Secure.
- Media Files Can Be Uploaded Easily and Quickly.
- WordPress Sites Are Accessible.
- It Offers Several SEO Tools Which Makes On-Site SEO Simple
Disadvantages
- Several Plugins May Slow Down Your Website.
- It Is Difficult To Modify And Format The Graphic Images And Tables.
- The Software Needs To Be Updated To Keep WordPress up-to-date And This Process Sometimes May Cause Data Loss.
- Also, The Knowledge Of PHP Is Required To Modifications Or Changes In Your Website.
You may be interested in reading Ajax Web Technologies.
WordPress Tutorials: WordPress-Installation:
System Requirements For WordPress
- Database − MySQL 5.0 +
- Web Server −
- WAMP (Windows)
- LAMP (Linux)
- XAMP (Multi-platform)
- MAMP (Macintosh)
- Operating System − Cross-platform
- Browser Support − IE (Internet Explorer 8+), Firefox, Google Chrome, Safari, Opera
- PHP Compatibility − PHP 5.2+
Download WordPress
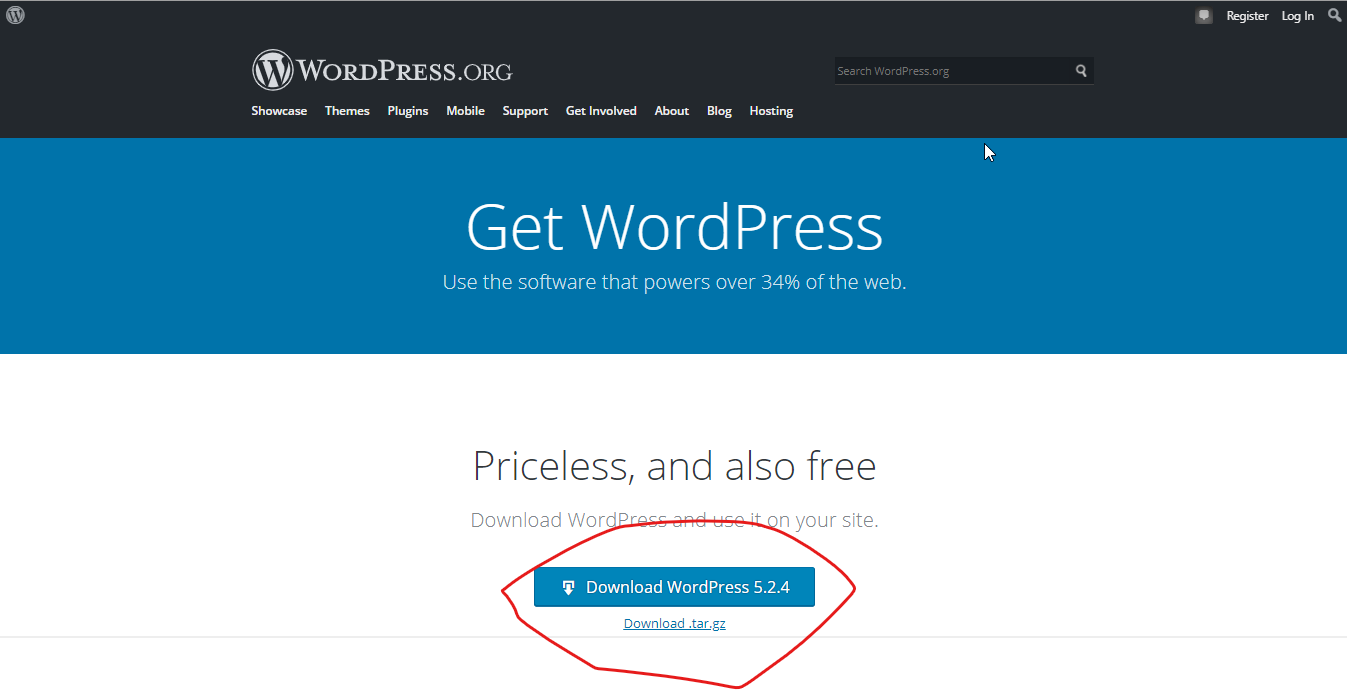
The very easy way to download WordPress is to go to the link: https://wordpress.org/download/.After clicking on this link, you will directly go to the WordPress download page. The page will be like this:
Create Store Data-Base
- WordPress software requires a MySQL database. So, first create a new empty database with user/password [e.g, user as “root” and password as “root” or anyone that will be convenient for you].
- Then, you can continue with the installation process as discussed further.
Set-Up Wizard
It is very easy to download WordPress locally on your system. The steps given below will describe you clearly.
STEP-1: First of all, extract the WordPress folder that you have downloaded and upload it into your localhost or web server.
STEP-2:Then open your browser and navigate to your WordPress file path, then you will see the very first screen of WordPress installer. The path of your WordPress will be like this: [localhost/<your_wordpress_folder>]. The screen will be like this:
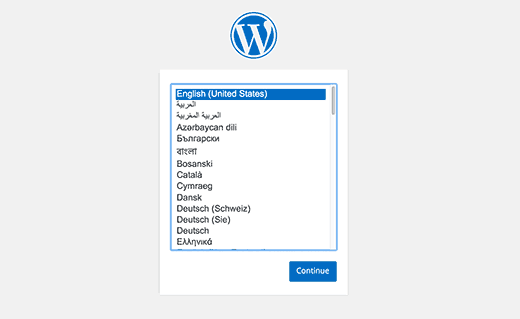
Select your convenient language and then press continue.
Step-3: Now you will see a page on which the information needed for the database before proceeding with WordPress installation is given.
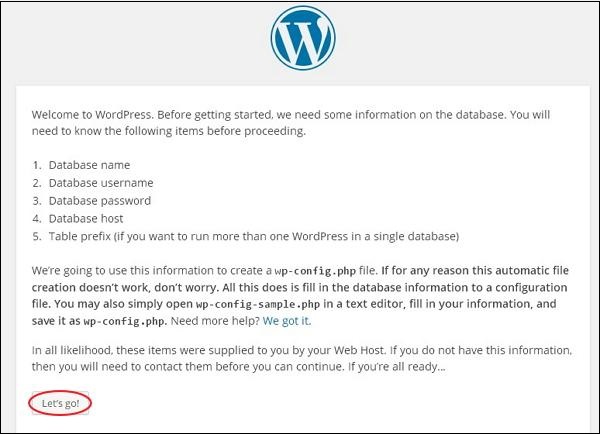
Click on Let’s go.
STEP-4: Here, you have to enter the information about the MySQL database as described in the given figure.
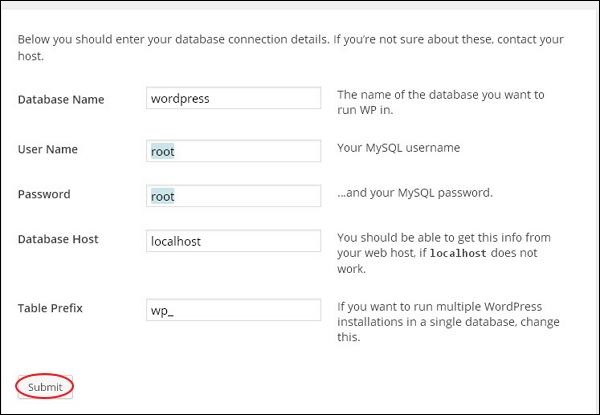
- Database Name: Enter the database name that you have created in the MySQL database for WordPress.
- Username: Enter the user name of your MySQL database.
- Password: Enter the password that you had set for the MySQL database.
- Database Host: Write the hostname, by default it will be localhost.
- Table Prefix: It is used to add a prefix in the database tables which helps to run multiple sites on the same database. It takes the default value.
After filling this information, click Submit.
Step-5: Then WordPress checks the settings of the database and a confirmation screen pop-up, as shown.
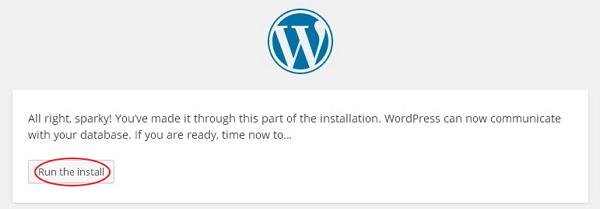
Click on Run-Install.
Step-6: Enter Administrative Information.
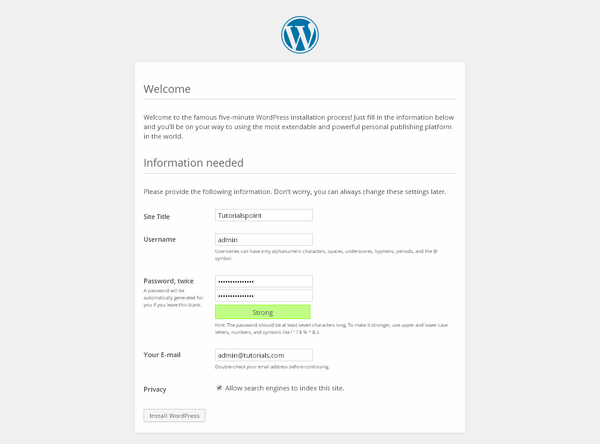
- Site Title − Enter the name of the site that you are going to create in WordPress.
- Username − Enter the username as per your choice while logging in the WordPress.
- Password twice − Enter the password twice to protect your site.
- Your E-mail − Enter your e-mail address that helps to recover the password or any update.
- Privacy − It allows the search engine to index this site after checking the checkbox.
After filling this information, click on Install WordPress.
Step-7: After WordPress successfully installs, the following screen will appear.
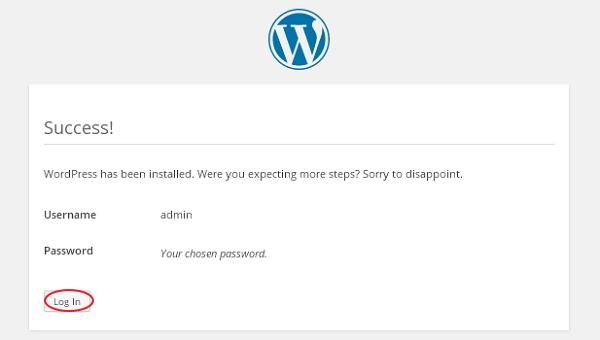
You can view your username and password detail added to WordPress.
Then click Log In.
Step-8: After clicking Log-In, a screen will appear containing the WordPress Admin Panel.
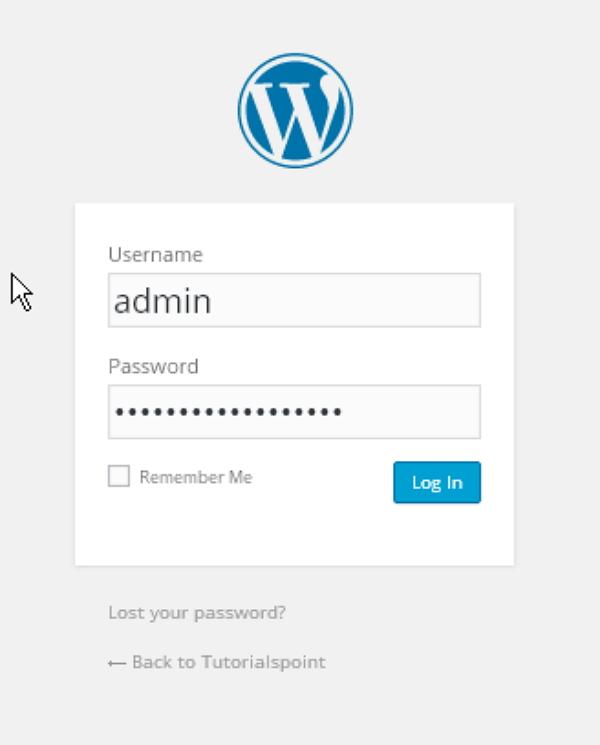
Enter the username and password which you had mentioned during installation as shown in step 6 and click on the login button.
WordPress Tutorials: WordPress-Dashboard
The very first screen that appears after you log’s in will be the WordPress Dashboard, which will display the overview of your website. It’s built to give you an overview of your entire website.
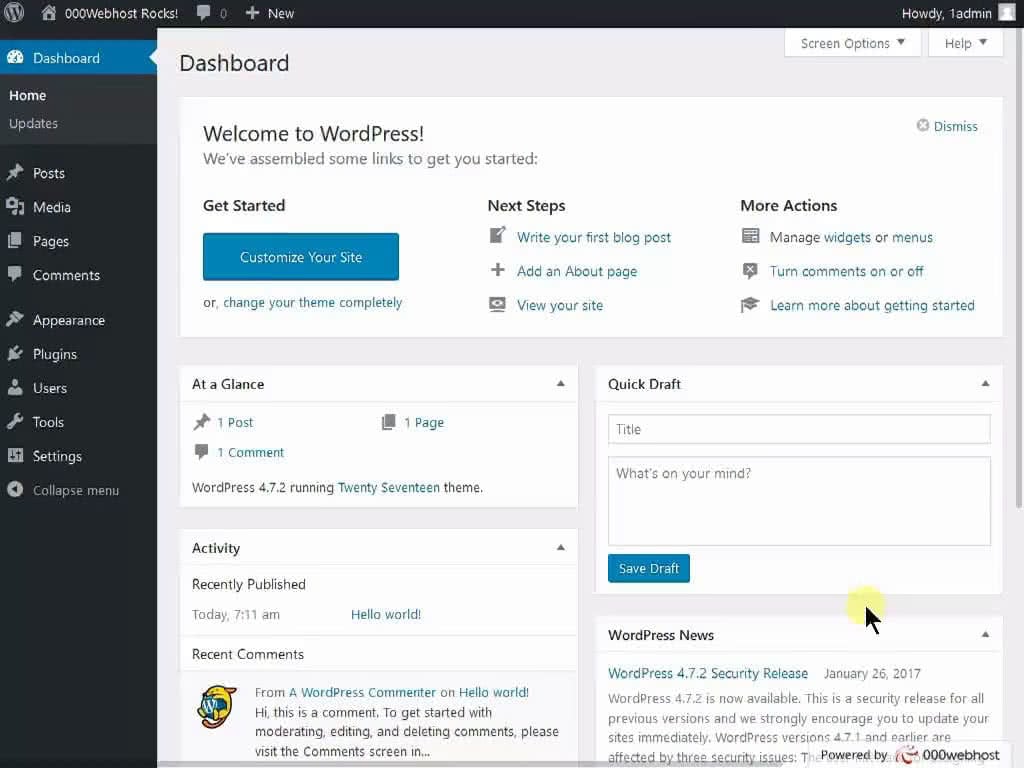
Dashboard Menu
The WordPress Navigation Menu is on the left side of the Dashboard. It contains links to all administrative screens of WordPress. If you hover over a menu item, a submenu with additional items will be displayed.
Admin Bar
An Admin Bar at the top of the page. It contains links to the most commonly used administrative functions and resources. For example, if you hover over your website’s name, you will get a link to the public view of your site. It also displays simple notifications like updates and new comments count.
Dashboard Widgets:
At A Glance
This box will tell you how many posts, pages, and comments you have. It also shows the WordPress version and theme you are running.
Quick Draft
Entering content into this box will start a new blog post. However, you cannot publish one from here as this box is only for taking blog posts ideas for you to come back to later.
Activity
The activity box gives you a bit more information about your latest posts and comments. It shows the status of all comments and a shortlist of the most recent comments.
WordPress News
This module displays the latest WordPress news.
Each of these windows has little arrows that you can use to quickly hide the box. You can also drag and drop them to different positions.
WordPress Tutorials: WordPress Setting
WordPress General Settings
Now it’s time to study the general settings of WordPress. This setting is used to set the basic configuration settings for your site.
The steps to access the General Settings are as follows:
Step-1: Click on Settings → General option in WordPress.
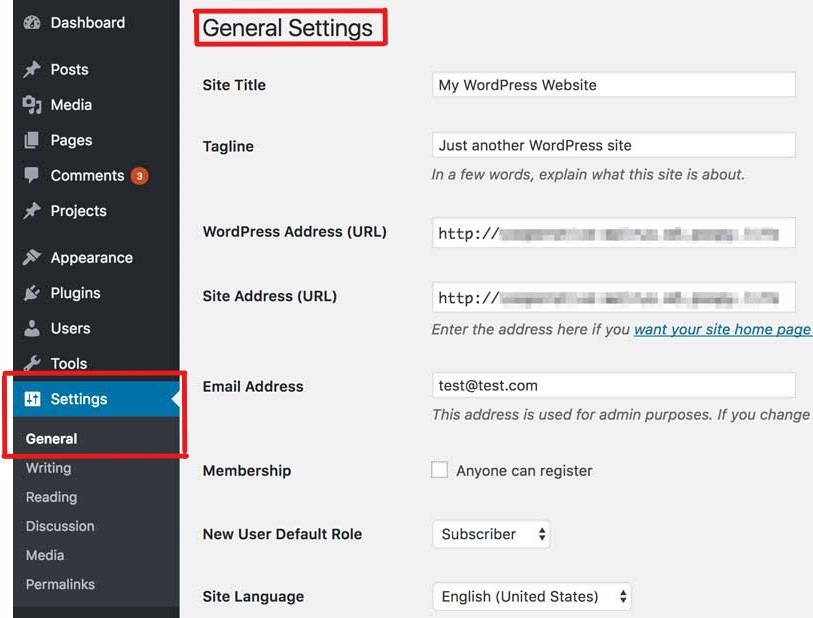
Step-2: The General Setting page is displayed.
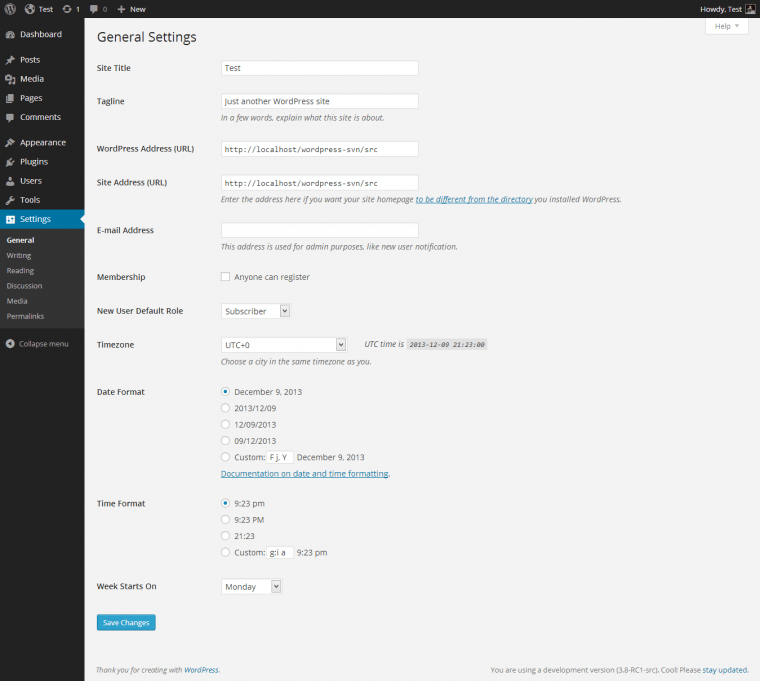
The following are the details of the fields given on the General Setting page.
- Site Title − Displays the name of the site in the template header.
- Tagline − Displays a short sentence about your site.
- WordPress Address (URL) − It’s the URL of WordPress directory where your all core application files are present.
- Site Address(URL) − Enter the site URL which you want your site to display on the browser.
- E-mail Address − Enter your e-mail address which helps to recover your password or any update.
- Membership − Anyone can register an account on your site after you check this checkbox.
- New User Default Role − The default role is set for the newly registered user or members.
- Timezone − Sets the time zone based on a particular city.
- Date Format − Sets the date format as you need to display on the site.
- Time Format − Sets the time format as you need to display on the site.
- Week Starts On − Select the weekday which you prefer to start for WordPress calendar. By default, it is set as Monday.
- Site Language − Sets the language for the WordPress dashboard.
Step-3: Press save changes button to save all of your settings, after filling your pieces of information. It saves your General settings.
WordPress Tutorials: WordPress-Writing Setting
These settings provide options for customizing the WordPress site and controls the writing experience. Also, These settings control the features in the adding and editing posts, Post via e-mail, Pages, and Post Types, as well as the optional functions like Remote Publishing, and Update Services.
To edit the writing settings, go to the Settings → Writing option.
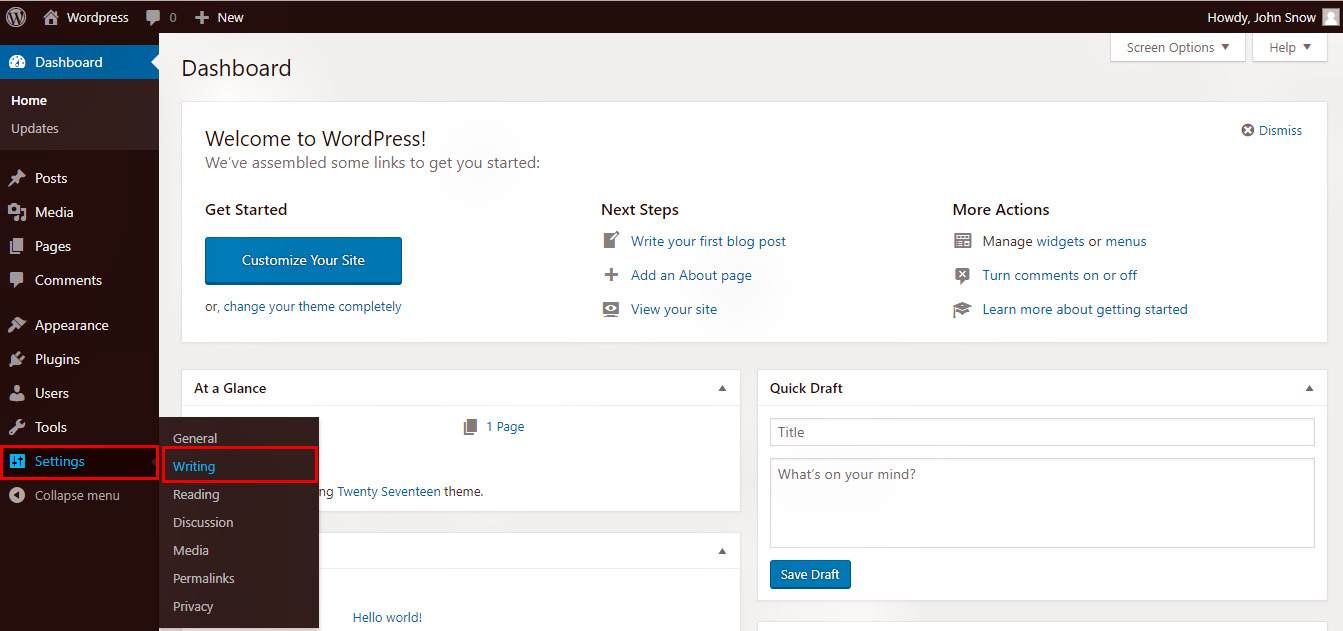
Step-2: The Writing Setting page is displayed.
![WordPress Tutorials: WordPress-Writing Setting — WordPress Tutorials [All in 1] Best Series](https://learncybers.com/api/media/file/5371.png)
The following are the details of the fields given on the Writing Setting page.
- Formatting − Defines two sub-options for a better user experience.
- The first option Convert emoticons like 🙂 and 😛 to graphics on display will turn text-based emoticons into graphics-based emoticons.
- The second option WordPress should correct invalidly nested XHTML automatically corrects the invalid XHTML placed within the posts or pages.
- Default Post Category − This is a category to be applied to a post and you can leave it as Uncategorized.
- Default Post Format −This is used by themes to select post format to be applied to a post or create different styles for different types of posts.
- Post via e-mail − This option uses the e-mail address to create posts and publishes posts on your blog through e-mail. To use this, you’ll need to set up a secret e-mail account with POP3 access, and any mail received at this address will be posted.
- Mail Server − This authorizes reading the e-mails which you send to WordPress and stores them for retrieval. To do this, you need to have a POP3 compatible mail server and it will have URI address such as mail.example.com, which you should enter here.
- Login Name − To create posts, WordPress will need its own e-mail account. The Login Name will use this e-mail address and should be kept as a secret as spammers will post links redirecting to their own websites.
- Password − Set a password for the above e-mail address.
- Default Mail Category − This allows selecting a custom category for all the posts that are published via Post by e-mail feature.
- Update Services − WordPress will automatically notify the site update services in the box when you publish a new post. See the Update Services on the codex for the long list of possible services.
Step-3: Press the Save Changes button to save your settings after you have completed all of this information.
WordPress Tutorials: WordPress-Reading Settings
In this lesson, we will study about the Reading Settings in WordPress. These settings allow setting the content related to the front page. You can set the number of posts to be displayed on the main page.
The steps to access the Reading Settings are as follows:
Step-1: Click on the Settings → Reading option in WordPress.
![WordPress Tutorials: WordPress-Reading Settings — WordPress Tutorials [All in 1] Best Series](https://learncybers.com/api/media/file/22.jpg)
Step-2: The Reading Setting page is displayed.
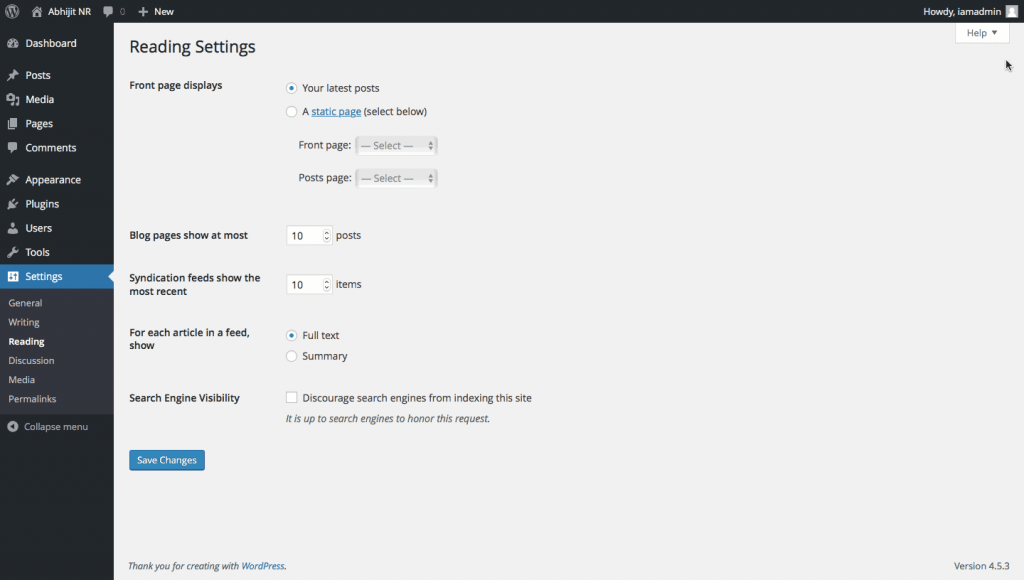
The following are the details of the fields given on the Reading Setting page.
- Frontpage displays: It is used to display the front page in any of the following formats:
- Your latest posts: This shows the latest posts on the front page.
- A static page: This static pages on the front page.
- Front Page: Select the actual page you want to display on the front page from the drop-down.
- Posts Page − Select the page from the drop-down which contains posts.
- Blog pages show at most: − This shows the number of posts to be displayed per page or site. By default, it is set as 10.
- Syndication feeds show the most recent: When users download one of the site feeds, they can view the number of posts here. It is set as 10 by default.
- For each article in a feed, show: It displays the post by selecting any of the following formats −
- Full Text − It displays the complete post. It is set as default.
- Summary − It displays the summary of the post.
- Search Engine Visibility: If you press this checkbox then this discourages search engines from indexing your site. Also, your site will be ignored by the search engine.
Step-3: Press the Save Changes button to save your settings after you have completed all of this information.
WordPress Tutorials: WordPress-Discussion Settings
Now, we will learn about the Discussion Settings of WordPress. These settings are explained as the interaction between the blogger and the visitors. The admin controls these settings. He controls the posts/pages that come in through the users.
The steps to access the Discussion Settings are as follows:
Step-1: Click on Settings → Discussion option in WordPress.
![WordPress Tutorials: WordPress-Discussion Settings — WordPress Tutorials [All in 1] Best Series](https://learncybers.com/api/media/file/26.png)
Step-2: The Discussion Settings page is displayed.
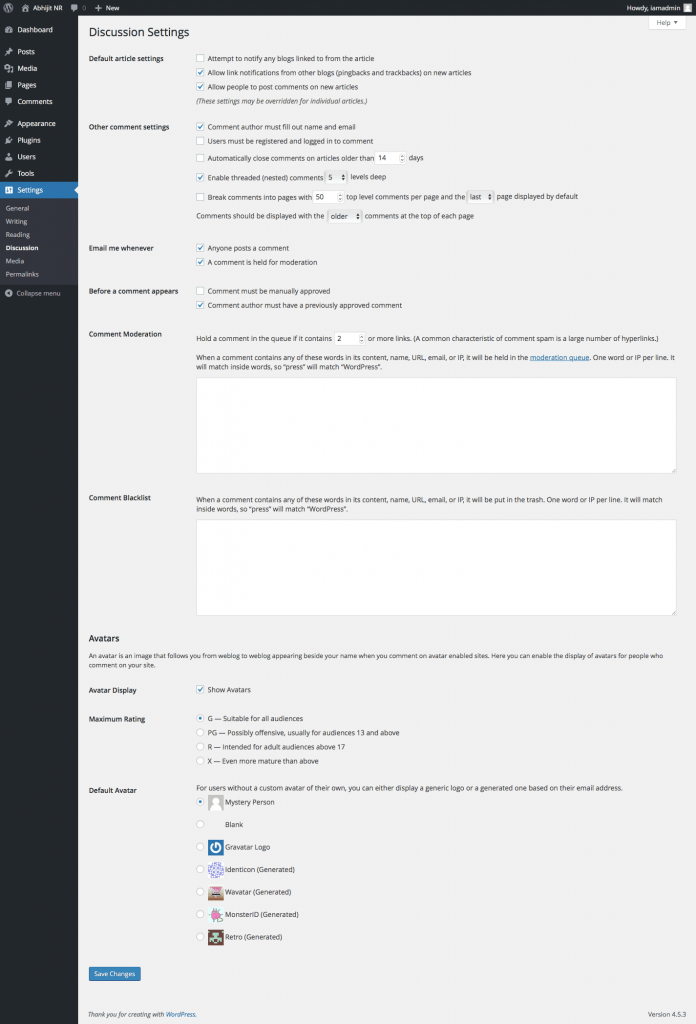
The following are the details of the fields given on the Discussion Setting page.
- Default article settings: These settings default to the new pages you create or new posts. This contains three more settings. They are:
- Attempt to notify any blogs linked to from the article: When you publish articles then it sends a notification (sends pings and trackback) to other blogs.
- Allow link notifications from other blogs (pingbacks and trackbacks): Accepts pings from other blogs.
- Allow people to post comments on new articles: You can allow or disallow other people to comment on your article using this setting. You can change the settings as per your will for individual articles.
- Other Comment Settings: It has the following options:
- Comment author must fill out name and e-mail: When you check this box, it is mandatory for visitors to fill their name and email address.
- Users must be registered and logged in to comment: If you check this box, only those registered visitors can leave comments, if not checked anyone can leave any number of comments.
- Automatically close comments on articles older than days: This option allows you to accept comments only for a particular time period as per your wish.
- Enable threaded (nested) comments: When you check this option, visitors can reply or have a discussion and get responses.
- Break comments into pages with top-level comments per page and the page displayed by default: If your pages are getting a lot of comments then you can split them into different pages by checking this box.
- Comments should be displayed with the comments at the top of each page: You can arrange the comments in the form of ascending or descending order.
- Email me whenever: It contains two options, namely:
- Anyone posts a comment: When you check into this box, the author gets an e-mail for every single comment that is posted.
- A comment is held for moderation: This is used in case you do not want your comment to be updated before it’s moderated by the admin.
- Before a comment appears: It allows how your posts are controlled. There are two more settings as following:
- A comment must be manually approved: If you check this box then only the approved comments by the admin can be displayed on the posts or pages.
- Comment author must have a previously approved comment: This can be checked when you want to approve a comment of an author whose has commented and his e-mail address matches the e-mail address of the previously posted comment. Otherwise, the comment is held for moderation.
- Comment Moderation: Contain only a specific number of links that are allowed into a comment.
- Comment Blacklist: You can input your own spam words that you do not want your visitors to enter into the comments, URL, e-mail, etc.; later it would filter the comments.
- Avatars: It is a small image that displays at the top-right-hand corner of the dashboard screen beside your name. It is like your profile picture. Here you have a few more options where you can set your avatar for WordPress site.
- Avatar Display: It displays your avatar beside your name when it is checked.
- Maximum rating: You have four other options of avatars you can use. They are G, PG, R, and X. This is the age section where you select according to which type of audience you want to display your posts.
- Default Avatar: In this option, there are few more types of avatars with images; you can keep these avatars according to your visitor’s e-mail address.
Step-3: Press the Save Changes button to save your settings after you have completed all of this information.
You may be interested in reading about Google SEO Ranking
WordPress Tutorials: WordPress-Media Settings
Here we will study the Media Settings of WordPress. These settings are used to set the height and width of the images which you’re going to use on your website.
The steps to access the Media Settings are as follows:
Step-1: Click on Settings → Media option in WordPress.
![WordPress Tutorials: WordPress-Media Settings — WordPress Tutorials [All in 1] Best Series](https://learncybers.com/api/media/file/28.png)
Step-2: The Media Settings page is displayed.
![WordPress Tutorials: WordPress-Media Settings — WordPress Tutorials [All in 1] Best Series](https://learncybers.com/api/media/file/27.png)
The following are the details of the fields given on the Media Setting page.
- Thumbnail size: Set the size of the thumbnail.
- Medium size: Set the height and width of medium size images.
- Large size: Set width and height of larger images.
- Uploading files: After checking this checkbox, the uploaded image will be arranged into a year and month based folder.
Step-3: Press the Save Changes button to save your settings after you have completed all of this information.
WordPress Tutorials: WordPress-Permalink Settings
Here we will study the Permalink Settings of WordPress. Permalink is a permanent link to a particular blog post or category. It allows setting the default permalink structure. These settings are used to add permalinks to your posts in WordPress.
The steps to access the Permalink Settings are as follows:
Step-1: Click on Settings → Permalinks option in WordPress.
![WordPress Tutorials: WordPress-Permalink Settings — WordPress Tutorials [All in 1] Best Series](https://learncybers.com/api/media/file/100.png)
Step-2: The Permalink Settings page is displayed.
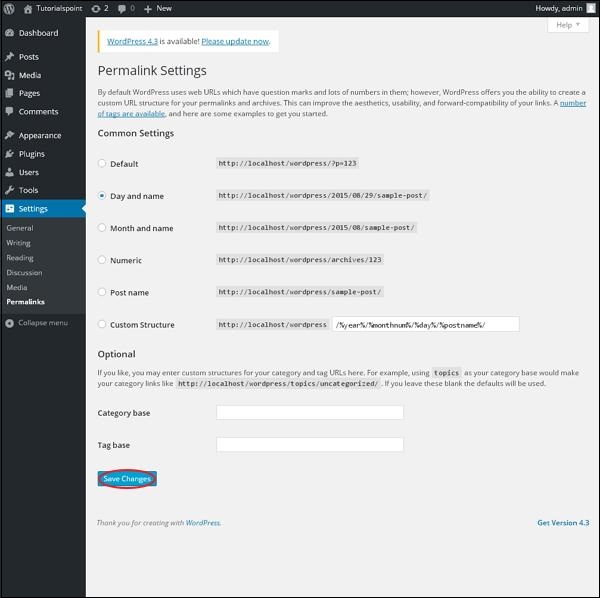
The following are the details of the fields given on the Permalink Setting page.
- Common settings: Check any of the radio buttons to choose your permalink structure for your blogs
- Default: This sets the default URL structure in WordPress.
- Day and name: This sets the URL structure according to the date and name in your posts.
- Month and name: This sets the URL structure according to the month and name in your post.
- Numeric: This sets numbers in the URL structure in your post.
- Post name: This sets the post name in the URL structure in your post.
- Custom Structure: This sets the URL structure of your choice by writing the desired name in the given text box.
- Optional: These are optional. You can add a custom structure for the main category or tag URL. If your text box is empty then default settings are used. Here you have two options.
- Category Base: Add a custom prefix for your category URL.
- Tag Base: Add a custom prefix to your Tags URL.
Step-3: Press the Save Changes button to save your settings after you have completed all of this information.
WordPress Tutorials: WordPress categories
WordPress-Add Category
In this chapter, we will learn abi=out how to add categories in WordPress. These are used to represent group related posts and sections of your site. It categorizes the group content into different sections. It is a very convenient way to organize posts.
The following steps will show how to access the category section in WordPress.
Step-1: Click on the Posts → Categories option in WordPress.
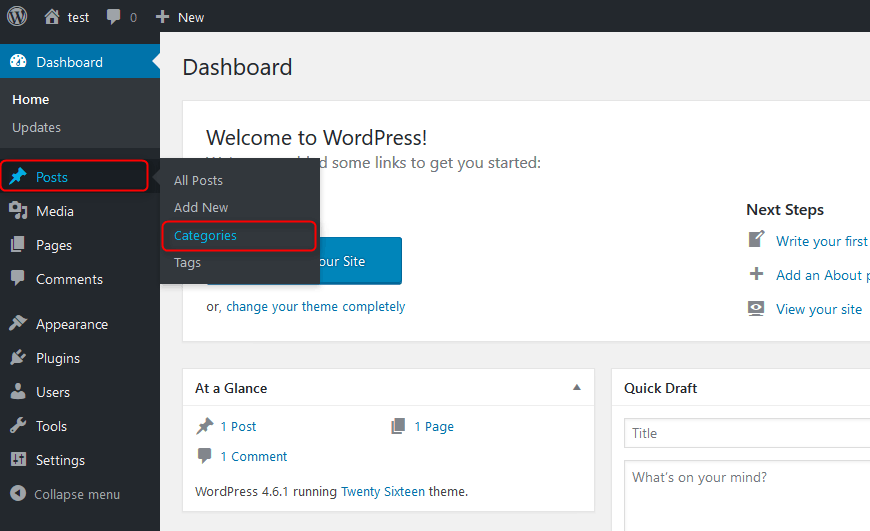
Step-2: The Category page is displayed.
![WordPress-Add Category — WordPress Tutorials [All in 1] Best Series](https://learncybers.com/api/media/file/2-1024x477.png)
The following are the details of the fields given on the Categories page.
- Name: Enter the unique name of categories.
- Slug: A word chosen to describe your post. It is specified in the tags URL.
- Parent: By selecting the parent category from dropdown, you can set the particular category as a sub-category or can keep it as None.
- Description: Add a brief description of your category. It is optional.
Step-3: Press the Add New Category button to save your settings after you have completed all of this information.
Step-4: After clicking on Add New Category, the newly created category will get displayed on the right side of the page.
![WordPress-Add Category — WordPress Tutorials [All in 1] Best Series](https://learncybers.com/api/media/file/1.png)
WordPress Tutorials: WordPress-Edit Category
Now, we will learn the simple steps to Edit Categories in WordPress.
The following steps show how to edit a category.
Step-1: Click on Posts → Categories in WordPress.
Step-2: You can see the Category (WordPress) on the right side of the page [ category- WordPress was created in topic WordPress-Add Category]. When you move the cursor over the categories, then a few options get displayed i.e; edit & quick edit.
Edit: Click on the Edit button in categories.
![WordPress Tutorials: WordPress-Edit Category — WordPress Tutorials [All in 1] Best Series](https://learncybers.com/api/media/file/6-1024x485.png)
Edit any of the required fields, and then click the Update button.
![WordPress Tutorials: WordPress-Edit Category — WordPress Tutorials [All in 1] Best Series](https://learncybers.com/api/media/file/5.png)
Quick Edit: Click on the Quick Edit button in categories.
![WordPress Tutorials: WordPress-Edit Category — WordPress Tutorials [All in 1] Best Series](https://learncybers.com/api/media/file/7.png)
You can only edit the Name and Slug of the category here. After filling the information’s press Update Category.
![WordPress Tutorials: WordPress-Edit Category — WordPress Tutorials [All in 1] Best Series](https://learncybers.com/api/media/file/8.png)
WordPress Tutorials: WordPress-Delete Category
Now we will learn about how to delete a category in WordPress.
The following steps show how to delete a category.
Step-1: Click on Posts → Categories in WordPress.
Step-2: Delete the category that you want to delete. Move your cursor over that category, few options will appear. Select the delete option to delete that category.
![WordPress Tutorials: WordPress-Delete Category — WordPress Tutorials [All in 1] Best Series](https://learncybers.com/api/media/file/9.png)
After you press the delete button, a message will pop-up asking for confirmation to delete the particular category.
![WordPress Tutorials: WordPress-Delete Category — WordPress Tutorials [All in 1] Best Series](https://learncybers.com/api/media/file/10.png)
Select OK to permanently delete that category.
WordPress Tutorials: WordPress-Arrange Categories
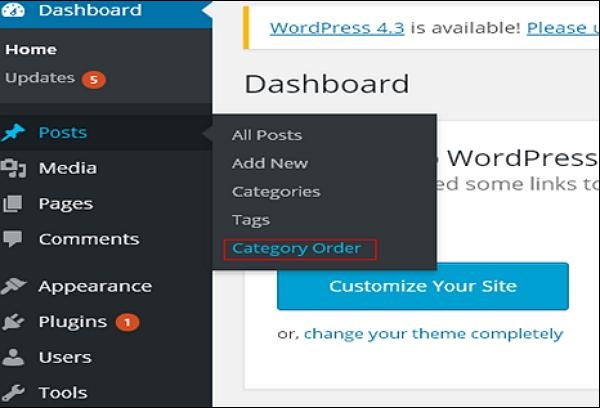
Now we will learn about how to Arrange Categories in WordPress. Directly arranging categories in WordPress is not possible. So in order to arrange your categories in a particular way, you need to download the Category Order plugin in WordPress.
The following steps will show you how to use the Category Order Plugin.
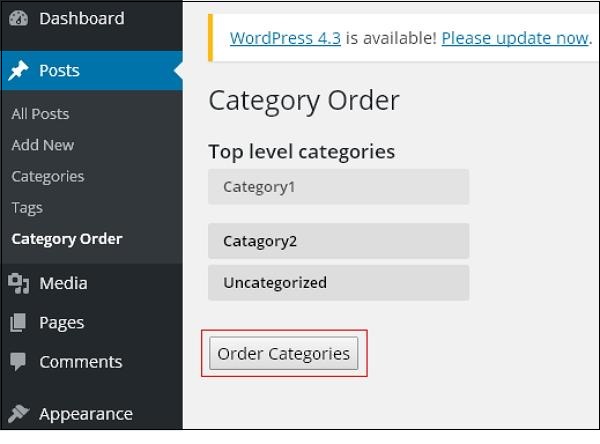
Step-1: Press Posts → Category Order in WordPress. The Category menu displays. You will learn how to install a plugin in the Plugin chapter.
Step-2: You can see the categories are not in order.
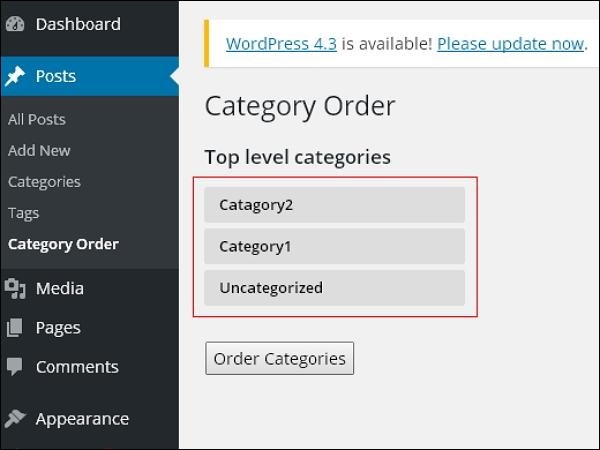
Step-3: You can rearrange the categories according to your own will. After you have done, press Order Categories.
WordPress Tutorials: WordPress Posts:
WordPress-Add Post
In this lesson, we will learn about how to add a post in WordPress. Posts are commonly known as articles and also they have known blogs or blog posts.
The following steps will show you how to add a post in WordPress.
Step-1: Click on Posts → Add New in WordPress.
![WordPress-Add Post — WordPress Tutorials [All in 1] Best Series](https://learncybers.com/api/media/file/11.png)
Step-2: The page will open. You can use the WordPress WYSIWYG editor to add the actual content of your post.
![WordPress-Add Post — WordPress Tutorials [All in 1] Best Series](https://learncybers.com/api/media/file/12.png)
This page contains:
- Post Title: Enter the title of the post, i.e., Post1.
- Post Content: Enter the content of your post.
Step-3: Click the Publish button to publish your post.
![WordPress-Add Post — WordPress Tutorials [All in 1] Best Series](https://learncybers.com/api/media/file/13.png)
A few other options are also present in the publish box. These are:
- Save Draft: It saves the post as a draft.
- Preview: You can preview your post before publishing.
- Move to Trash: Deletes the post.
- Status: Change the status of your post to Published, Pending, or Reviewer Draft.
- Visibility: Change the visibility of the post to Public, Private or Password Protected.
- Published: Change the published post date and time.
WordPress-Edit Posts
Now we will learn how to edit a post in WordPress.
The following steps will show you how to edit a WordPress post.
Step-1: Click on Posts → All Posts in WordPress.
![WordPress-Edit Posts — WordPress Tutorials [All in 1] Best Series](https://learncybers.com/api/media/file/14.png)
Step-2: You can see all of your posts here.
![WordPress-Edit Posts — WordPress Tutorials [All in 1] Best Series](https://learncybers.com/api/media/file/15.png)
Step-3: When you move the cursor over any of the post names, some options will display. These are:
- Edit: You can edit your post using this option.
- Quick Edit: You can edit the slug, title, and date of your post. Also, you can select the category for your post.
- Trash: This option is used to permanently delete your post from WordPress.
- Preview: You can preview your post using this option.
Step-4: You can edit your post by pressing the edit option. The following screen will appear.
![WordPress-Edit Posts — WordPress Tutorials [All in 1] Best Series](https://learncybers.com/api/media/file/19-1024x480.png)
WordPress Tutorials: WordPress-Delete Post
Now we will see how to delete a post.
The following steps will show you how to delete a post.
Step-1: Click on Posts → All Post in WordPress.
![WordPress Tutorials: WordPress-Delete Post — WordPress Tutorials [All in 1] Best Series](https://learncybers.com/api/media/file/14-1024x458.png)
Step-2: You can delete the post which you want to delete. Just move your cursor over that post. You will see a Trash Button below that post. Press to delete that post.
![WordPress Tutorials: WordPress-Delete Post — WordPress Tutorials [All in 1] Best Series](https://learncybers.com/api/media/file/16.png)
Step-3: You will see a confirmation message that your post is deleted permanently.
![WordPress Tutorials: WordPress-Delete Post — WordPress Tutorials [All in 1] Best Series](https://learncybers.com/api/media/file/18.png)
WordPress Tutorials: WordPress-Preview Posts
Now we will learn how to preview the posts in WordPress. Preview Post is to view the post before it is published to the user. Previewing your post is safer and this verifies how your post looks on the website.
The following steps will show you how to preview a post in WordPress.
Step-1: Click on Posts → All Posts in WordPress.
Step-2: Move your cursor over that post. You will see a few options. Select the preview option.
![WordPress Tutorials: WordPress-Preview Posts — WordPress Tutorials [All in 1] Best Series](https://learncybers.com/api/media/file/17.png)
Step-3: you can also preview your post when you are editing your post.
![WordPress Tutorials: WordPress-Preview Posts — WordPress Tutorials [All in 1] Best Series](https://learncybers.com/api/media/file/20.png)
WordPress Tutorials: WordPress-Publish Posts
Now we will learn about how to Publish a Post in WordPress. Publish is used to make the post available to all the users wherein every user can view that particular post.
The following steps will show how to Publish a Post.
Step-1: Click on Posts → Add New in WordPress.
![WordPress Tutorials: WordPress-Publish Posts — WordPress Tutorials [All in 1] Best Series](https://learncybers.com/api/media/file/11-1024x453.png)
Step-2: You can use the WordPress WYSIWYG editor to add the actual content of your post.
Step-3: Click on the Publish button when you have finished editing your post.
![WordPress Tutorials: WordPress-Publish Posts — WordPress Tutorials [All in 1] Best Series](https://learncybers.com/api/media/file/13-1024x481.png)
After you press it, your post will be published and can be viewed by the users.
WordPress Tutorials: WordPress Media:
WordPress-Media Library
Now it’s time to learn about the WordPress Media Library. All of your images, audios, files, and videos will be stored in the media library. Here you can view, add, edit or delete any media-related objects if not needed.
The following steps will show you how to access the media library in WordPress.
Step-1: Click on Media → Library in WordPress.
![WordPress-Media Library — WordPress Tutorials [All in 1] Best Series](https://learncybers.com/api/media/file/1-1.png)
Steep-2: The files that are uploaded to WordPress can be viewed here.
![WordPress-Media Library — WordPress Tutorials [All in 1] Best Series](https://learncybers.com/api/media/file/2-2.png)
Step-3: You can edit, delete and view these files here. You can also add new files by pressing the add button here.
![WordPress-Media Library — WordPress Tutorials [All in 1] Best Series](https://learncybers.com/api/media/file/3-1.png)
Step-4: The various tabs that appear on the Media Library page are:
- List View: Displays the images and videos in the list form.
- Grid View: Displays all images in the grid format.
- Filter the images and videos: Filters the images and videos.
- Search Box: Helps to search a particular image by inserting the name into the box.
WordPress Tutorials: WordPress-Add Media
Now we will see how to add Media to WordPress. WordPress allows you to add, all kinds of media files like videos, audios, and images.
The following steps will show you how to add media to WordPress.
Step-1: Click on Media → Add New in WordPress.
![WordPress Tutorials: WordPress-Add Media — WordPress Tutorials [All in 1] Best Series](https://learncybers.com/api/media/file/4-1.png)
Step-2: Then press adds new option to add new files to WordPress.
![WordPress Tutorials: WordPress-Add Media — WordPress Tutorials [All in 1] Best Series](https://learncybers.com/api/media/file/5-1.png)
Step-3: Select the media files that you want to add and then press open.
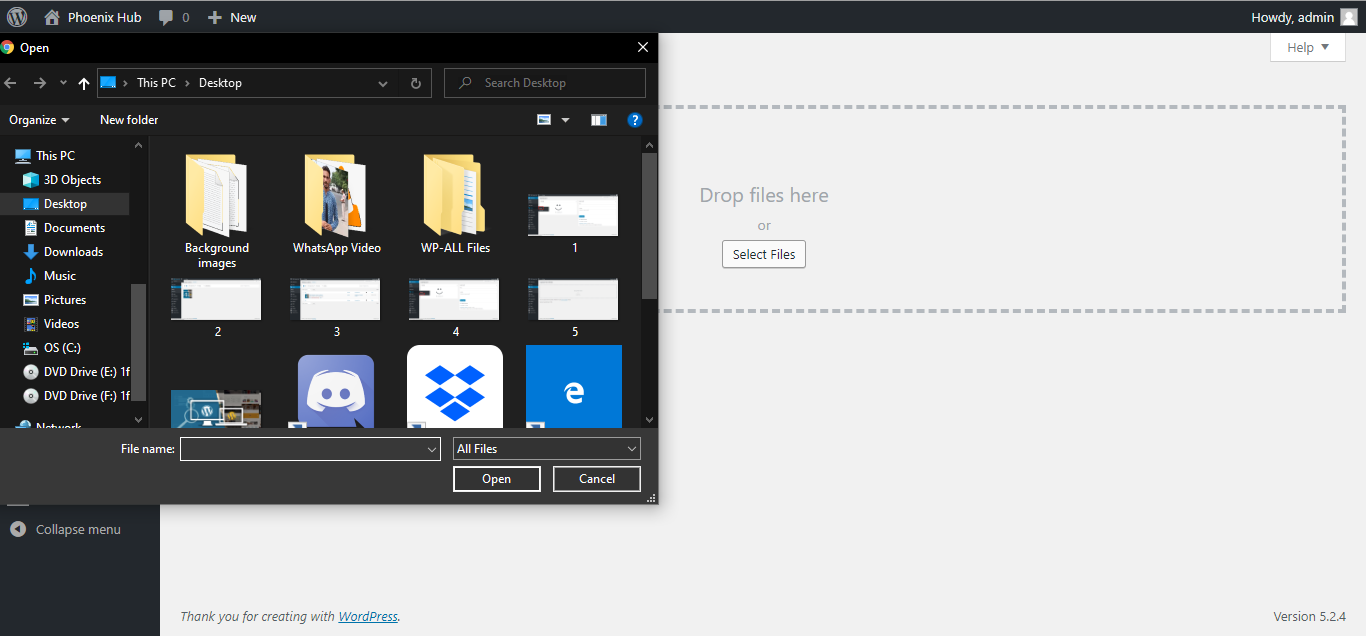
Step-4: Your files will be uploaded.
![WordPress Tutorials: WordPress-Add Media — WordPress Tutorials [All in 1] Best Series](https://learncybers.com/api/media/file/6-1.png)
WordPress Tutorials: WordPress-Insert Media
Now we will study how to Insert Media in WordPress. Media files can be inserted to your Pages or Posts from libraries, from local storage or from URLs.
The following steps will show you how to Insert Media in WordPress.
Step-1: Click on Posts → Add New in WordPress.
![WordPress Tutorials: WordPress-Insert Media — WordPress Tutorials [All in 1] Best Series](https://learncybers.com/api/media/file/7-1-1024x478.png)
Step-2: Click on Add Media.
![WordPress Tutorials: WordPress-Insert Media — WordPress Tutorials [All in 1] Best Series](https://learncybers.com/api/media/file/8-1-1024x478.png)
Step-3: You can select the files from the Media Library tab.
![WordPress Tutorials: WordPress-Insert Media — WordPress Tutorials [All in 1] Best Series](https://learncybers.com/api/media/file/9-1.png)
Step-4: In this box, you can directly add an image from your device. You can also add images from the media library of WordPress. And you can also add an image by using the URL of that image.
WordPress Tutorials: WordPress-Edit Media
It’s time to learn about editing WordPress media. You can manage all the information about your media that is saved in the Media Library.
The following steps will show you how to do this.
Step-1: Click on Media → Library and click on the name of the media item or the edit link.
![WordPress Tutorials: WordPress-Edit Media — WordPress Tutorials [All in 1] Best Series](https://learncybers.com/api/media/file/1-1-1024x477.png)
Step-2: You will view the list of the media files that you have uploaded. Select anyone that you want to edit.
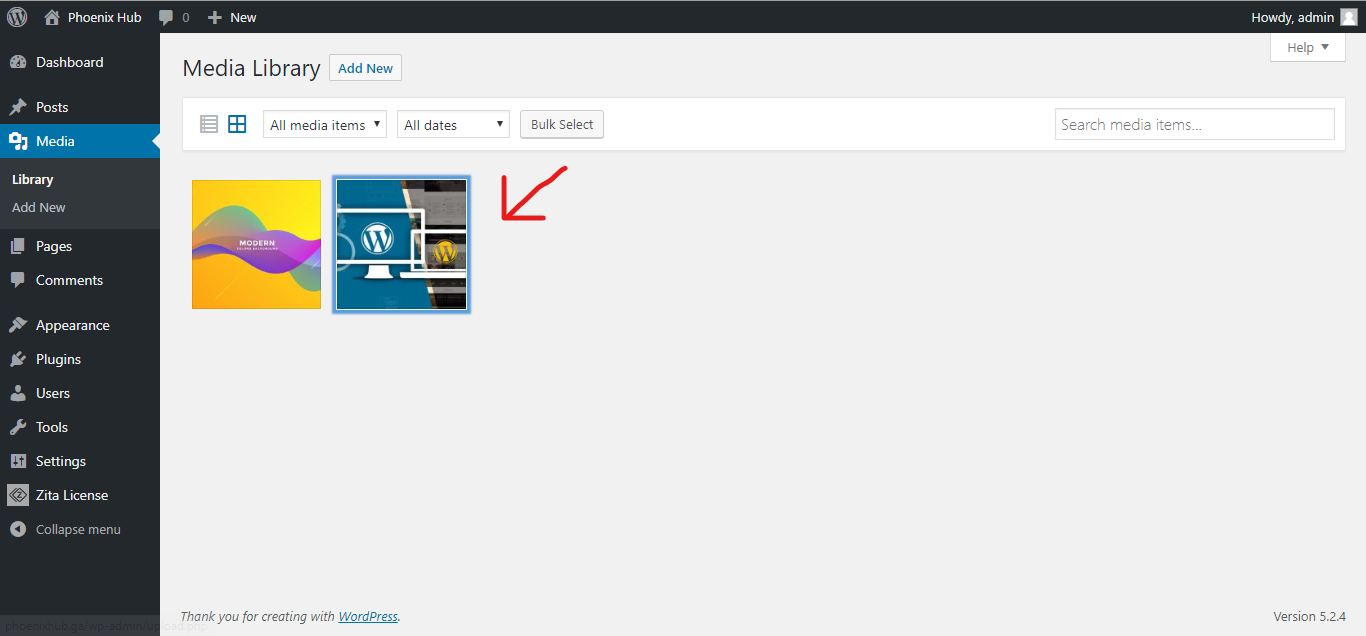
Step-3: The edit media page will open the right side of the page
![WordPress Tutorials: WordPress-Edit Media — WordPress Tutorials [All in 1] Best Series](https://learncybers.com/api/media/file/10-1.png)
- URL: You can read only a link from the media file.
- Title: This displays the name of the media. The title is often shown in galleries and attachment pages if themes or plugins are designed to display it.
- Permalink: Permalink is the URL of the media attachment page. This is also a link to view the attachment page.
- Edit image button: This allows you to edit the image position, such as rotate counter-clockwise, rotate clockwise, scale, crop, flip vertically, and flip horizontally.
- Caption: A brief explanation of the media.
- Alternate Text: The alt text for the image, which is used to describe media. Used for availability.
- Description: An explanation of your media file.
- Delete Permanently: Delete your media file permanently.
Step-4: Click on the Update button to save the changes made to an image once you complete editing the required fields.
![WordPress Tutorials: WordPress-Edit Media — WordPress Tutorials [All in 1] Best Series](https://learncybers.com/api/media/file/11-2.png)
WordPress Tutorials: WordPress Pages:
WordPress-Add Page
Now we will study how to Add Pages into WordPress. Adding pages is similar to adding posts in WordPress. Pages are static content and often do not change its displayed information.
The following steps will show you how to do this.
Step-1: Click on Pages → Add New.
![WordPress-Add Page — WordPress Tutorials [All in 1] Best Series](https://learncybers.com/api/media/file/2-3.png)
Step-2: The following screen will open. It has two tabs, Visual and Text. You can insert text in either of these. Here, we’ll study about inserting text into Visual format.
![WordPress-Add Page — WordPress Tutorials [All in 1] Best Series](https://learncybers.com/api/media/file/6-2-1024x477.png)
The information given on this page is as under:
- Add Title: Write the title of your page.
- Start Writing or type/to choose block: You can start writing your text or you can add a new block by pressing the plus ”+” button.
Step-3: Press the plus button to add new blocks on your page.
![WordPress-Add Page — WordPress Tutorials [All in 1] Best Series](https://learncybers.com/api/media/file/7-2.png)
You will find the following things in this box:
- Paragraph: Add a paragraph to start writing your page/post.
- Image: Add an image to your post/page.
- Heading: Add the title/heading of your page/post.
- Gallery: Add multiple images to your page/post.
- List: Write your post like a list.
- Quote: Write your post like a quote.
- Audio: Add audios to your page/post.
- Cover: Add a cover to your post.
- File: Add a file in your post/page.
- And many others.
WordPress Tutorials: WordPress-Publish Pages
Now, we will study how to Publish Pages in WordPress. The command, “Publish” is used to make the pages available to all users wherein each user can view that particular page.
The following steps will show you how to publish a page in WordPress.
Step-1: Click on Pages → Add New in WordPress.
![WordPress Tutorials: WordPress-Publish Pages — WordPress Tutorials [All in 1] Best Series](https://learncybers.com/api/media/file/2-3-1024x475.png)
Step-2: The following screen will open. you can edit your page as described in WordPress-Edit Pages.
Step-3: Click on the publish button to publish your page.
![WordPress Tutorials: WordPress-Publish Pages — WordPress Tutorials [All in 1] Best Series](https://learncybers.com/api/media/file/8-2.png)
After clicking on publish, your posts get published for the user to view it.
WordPress Tutorials: WordPress-Edit Pages
It’s time to learn about editing the WordPress pages.
The following steps will show you how to edit pages in WordPress.
Step-1: Click on Pages → All Pages in WordPress.
![WordPress Tutorials: WordPress-Edit Pages — WordPress Tutorials [All in 1] Best Series](https://learncybers.com/api/media/file/9-2.png)
Step-2: You will view all your pages here. When you move your cursor over any of the pages, you will view some options. These are Edit & Quick Edit.
![WordPress Tutorials: WordPress-Edit Pages — WordPress Tutorials [All in 1] Best Series](https://learncybers.com/api/media/file/10-2.png)
Edit: Click on the edit option.
![WordPress Tutorials: WordPress-Edit Pages — WordPress Tutorials [All in 1] Best Series](https://learncybers.com/api/media/file/11-3.png)
You can edit or change the content or title from the page as per your need, and then click on the Update button.
![WordPress Tutorials: WordPress-Edit Pages — WordPress Tutorials [All in 1] Best Series](https://learncybers.com/api/media/file/13-1.png)
Quick Edit: Click on a quick edit option.
![WordPress Tutorials: WordPress-Edit Pages — WordPress Tutorials [All in 1] Best Series](https://learncybers.com/api/media/file/12-1.png)
You can edit the Title, Slug and date of the About Us page and can also select the parent for your page.
![WordPress Tutorials: WordPress-Edit Pages — WordPress Tutorials [All in 1] Best Series](https://learncybers.com/api/media/file/14-1.png)
WordPress Tutorials: WordPress-Delete Pages
Now we will learn how to delete a page in WordPress. It is good to delete unnecessary and waste pages from your WordPress.
The following steps will show you how to do this.
Step-1: Click on Pages → All Pages in WordPress.
![WordPress Tutorials: WordPress-Delete Pages — WordPress Tutorials [All in 1] Best Series](https://learncybers.com/api/media/file/9-2-1024x475.png)
Step-2: Hover Over the page that you want to delete. Press the trash button to permanently delete that page from WordPress.
![WordPress Tutorials: WordPress-Delete Pages — WordPress Tutorials [All in 1] Best Series](https://learncybers.com/api/media/file/15-1.png)
Step-3: The following notification will pop-up.
![WordPress Tutorials: WordPress-Delete Pages — WordPress Tutorials [All in 1] Best Series](https://learncybers.com/api/media/file/16-1.png)
You can also undo this action by pressing the undo button in the confirmation message.
WordPress Tutorials: WordPress Tags:
WordPress-Add Tags
A piece of small information that is attached to the main content or post for the purpose of identification is known as Tag. It tells the visitors what actually the post is about. If the tag is mentioned properly then it helps to find the content very easily.
The following are the steps to Add Tags in WordPress.
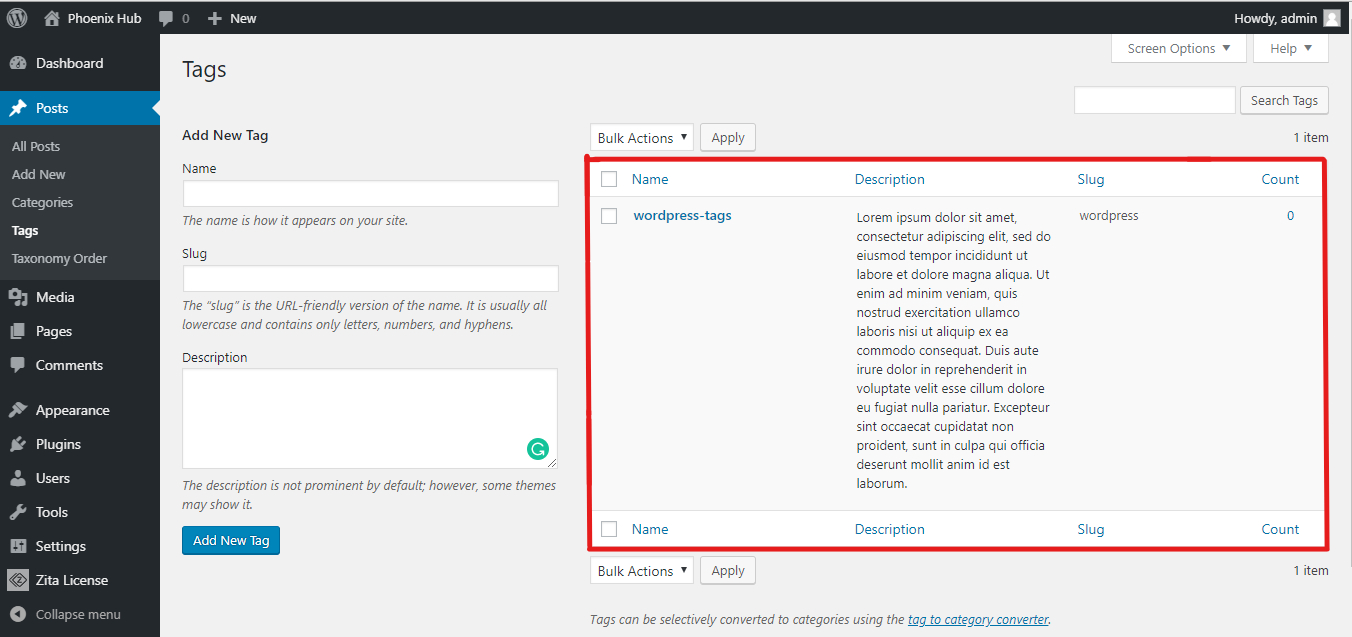
Step-1: Click on Posts → Tags in WordPress.
![WordPress-Add Tags — WordPress Tutorials [All in 1] Best Series](https://learncybers.com/api/media/file/1-2.png)
Step-2: The tags page will open.
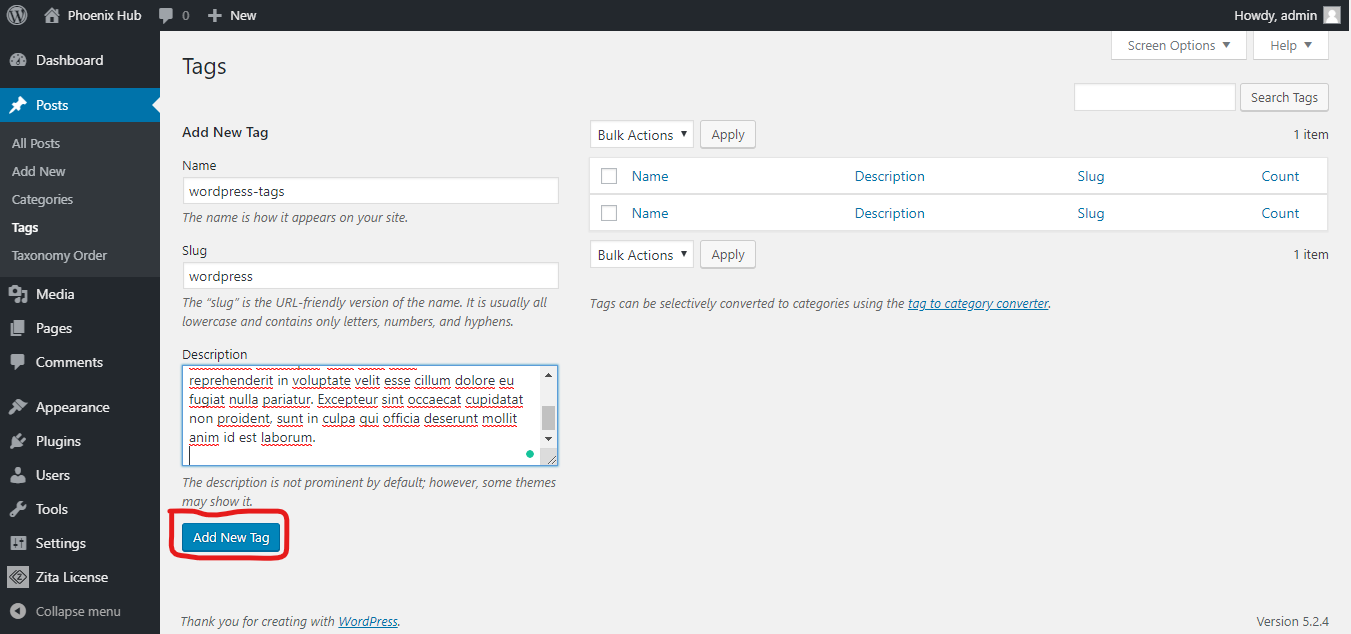
The details of fields on this page are as follows:
- Name: Enter the name of the tags.
- Slug: A word chosen to describe your post. It is specified in the tags URL.
- Description: Add a brief description of your tag. It gets displayed when you hover on the tag.
Step-3: After filling these pieces of information press Add New Tags. The newly created tags will get displayed on the right side of the page.
WordPress Tutorials: WordPress-Edit Tags
Now we will learn about how to edit the tags in WordPress.
The following steps will show you how to do this.
Step-1: Click on Posts → Tags in WordPress.
![WordPress Tutorials: WordPress-Edit Tags — WordPress Tutorials [All in 1] Best Series](https://learncybers.com/api/media/file/1-3.png)
Step-2: You will see the tags that you have added in WordPress. Hover over the tag that you want to edit. You will see some options. These are Edit and Quick Edit.
Edit: Click on the Edit option in the Tags section.
![WordPress Tutorials: WordPress-Edit Tags — WordPress Tutorials [All in 1] Best Series](https://learncybers.com/api/media/file/4-3.png)
You can edit any of the required fields and then click on the Update button.
![WordPress Tutorials: WordPress-Edit Tags — WordPress Tutorials [All in 1] Best Series](https://learncybers.com/api/media/file/6-3.png)
Quick Edit: Click on the Quick Edit option in the Tags section.
![WordPress Tutorials: WordPress-Edit Tags — WordPress Tutorials [All in 1] Best Series](https://learncybers.com/api/media/file/5-2.png)
Here you can only edit the Name and Slug of the Tags as seen and then click on the Update Tag button.
![WordPress Tutorials: WordPress-Edit Tags — WordPress Tutorials [All in 1] Best Series](https://learncybers.com/api/media/file/7-3.png)
WordPress Tutorials: WordPress-Delete Tags
In this lesson, we will learn to Delete tags in WordPress.
The following are the steps to delete tags in WordPress.
Step-1: Click on Posts → Tags in WordPress.
![WordPress Tutorials: WordPress-Delete Tags — WordPress Tutorials [All in 1] Best Series](https://learncybers.com/api/media/file/1-3-1024x476.png)
Step-2: Hover over the tag that you want to delete. Select the delete option to delete that tag.
![WordPress Tutorials: WordPress-Delete Tags — WordPress Tutorials [All in 1] Best Series](https://learncybers.com/api/media/file/8-3.png)
The following confirmation screen will open. Select ok to permanently delete your tag.
![WordPress Tutorials: WordPress-Delete Tags — WordPress Tutorials [All in 1] Best Series](https://learncybers.com/api/media/file/9-3.png)
WordPress Tutorials: WordPress Links:
WordPress-Add Links
Now we will learn to Add Links in WordPress pages. Link is a connection from one resource to another. Adding links to your pages or blog posts help you to connect to other pages.
The following are the simple steps to Add links in WordPress.
Step-1: Click on Pages → All Pages in WordPress.
![WordPress-Add Links — WordPress Tutorials [All in 1] Best Series](https://learncybers.com/api/media/file/10-3-1024x477.png)
Step-2: All of your pages will be displayed here. Select any of the pages to add links inside it and press the edit button.
![WordPress-Add Links — WordPress Tutorials [All in 1] Best Series](https://learncybers.com/api/media/file/11-4.png)
Step-3: Select any of the sentences or words where you want to add a link. Here, we will add a link to the word Google.
![WordPress-Add Links — WordPress Tutorials [All in 1] Best Series](https://learncybers.com/api/media/file/13-2-1024x478.png)
Step-3: Select Google. Then select the chain button. Paste or write the URL in the box. Then press enter to add the link. After you press enter then this will be shown.
![WordPress-Add Links — WordPress Tutorials [All in 1] Best Series](https://learncybers.com/api/media/file/14-2.png)
The link is added.
WordPress Tutorials: WordPress-Edit Link
Now we will learn how to edit a link in WordPress.
The following steps will show you how to do this.
Step-1: Click on Pages → All Pages.
Step-2: Select the page in which you want to edit the link. Then press the Edit button to open the edit page.
![WordPress Tutorials: WordPress-Edit Link — WordPress Tutorials [All in 1] Best Series](https://learncybers.com/api/media/file/11-4-1024x475.png)
Step-3: Press the word whose link you want to edit. The link box will open.
![WordPress Tutorials: WordPress-Edit Link — WordPress Tutorials [All in 1] Best Series](https://learncybers.com/api/media/file/14-2-1024x476.png)
Step-4: Press the pencil option to edit the link.
![WordPress Tutorials: WordPress-Edit Link — WordPress Tutorials [All in 1] Best Series](https://learncybers.com/api/media/file/15-2.png)
Edit the link and then press enter. Your link will be edited.
WordPress Tutorials: WordPress-Delete Link
Here we will learn how to delete a link in WordPress.
The following steps will show you how to do this.
Step-1: Click on Pages → All Pages in WordPress.
Step-2: The pages screen will open.
Step-3: Select the page in which you want to delete the link. Press Edit. The edit screen will open.
![WordPress Tutorials: WordPress-Delete Link — WordPress Tutorials [All in 1] Best Series](https://learncybers.com/api/media/file/16-2-1024x476.png)
Step-4: Select the word whose link you want to delete. Then press the chain/unlink button.
![WordPress Tutorials: WordPress-Delete Link — WordPress Tutorials [All in 1] Best Series](https://learncybers.com/api/media/file/17-1.png)
Step-5: Your link is deleted or you can also say your word is unlinked.
![WordPress Tutorials: WordPress-Delete Link — WordPress Tutorials [All in 1] Best Series](https://learncybers.com/api/media/file/18-1.png)
WordPress Tutorials: WordPress Comments:
WordPress-Add Comments
Now, we will learn to Add Comments in WordPress. Adding comments allows your visitors to have a discussion with you. Comments are approved by the admin and then posted to be discussed further.
The following are the steps to add comments to your blog posts.
Step-1: Click on Pages → All Pages in WordPress.
Step-2: The pages screen will be displayed. Click on a post.
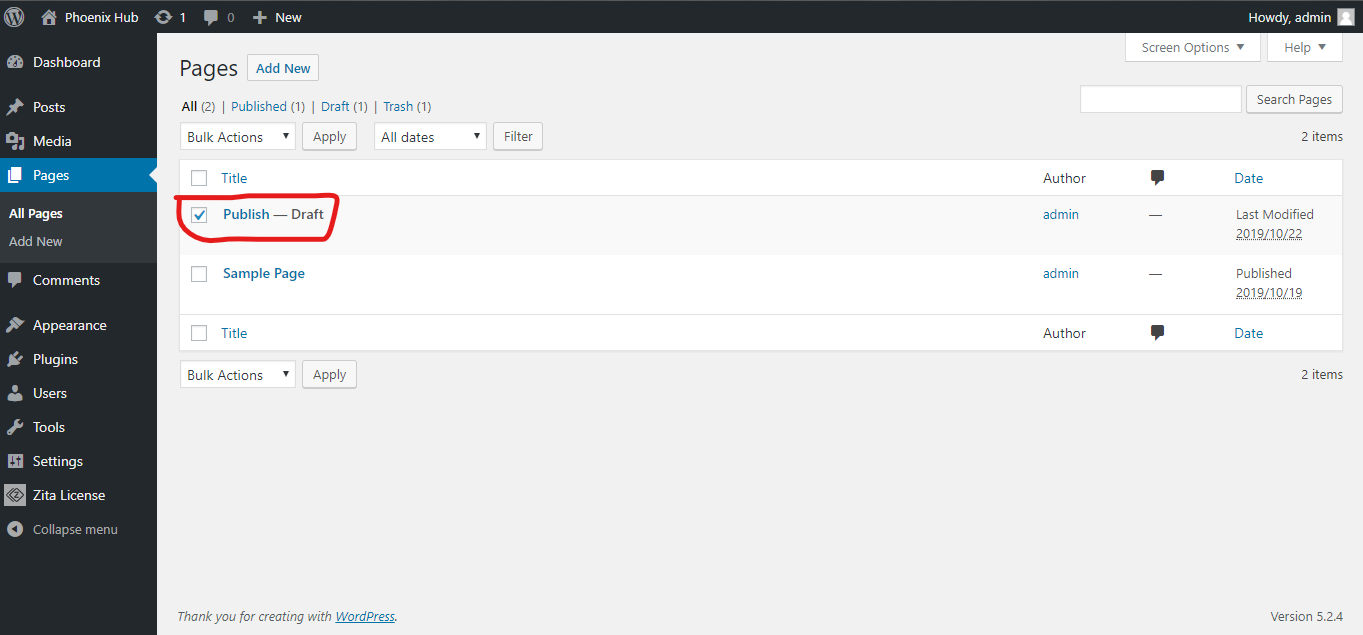
Step-3: The edit page will open. There is a discussion option in the very right sidebar of the page. click and select it.
![WordPress-Add Comments — WordPress Tutorials [All in 1] Best Series](https://learncybers.com/api/media/file/1-4.png)
Step-4: Now your the comments box for this page is available. You can view it by pressing the preview button. It looks like this.
![WordPress-Add Comments — WordPress Tutorials [All in 1] Best Series](https://learncybers.com/api/media/file/2-4.png)
In the comment section, you can add comments by clicking the post comment button. Then press saves a draft or publish option to save your progress.
WordPress Tutorials: WordPress-Edit Comments
Here, we will learn about how to Edit comments in WordPress. Editing comments can be done only by the admin.
The following are the steps to Edit Comments in WordPress.
Step-1: Click on Comments in WordPress.
![WordPress Tutorials: WordPress-Edit Comments — WordPress Tutorials [All in 1] Best Series](https://learncybers.com/api/media/file/3-2-1024x477.png)
Step-2: The comment page will open. Hover over any of the comments. Some options will appear. Select edit one.
![WordPress Tutorials: WordPress-Edit Comments — WordPress Tutorials [All in 1] Best Series](https://learncybers.com/api/media/file/7-4-1024x480.png)
Step-3: The edit page will open. After making changes to the comment, press the update button to save your changes.
![WordPress Tutorials: WordPress-Edit Comments — WordPress Tutorials [All in 1] Best Series](https://learncybers.com/api/media/file/8-4.png)
Here you can edit the name, e-mail, URL or the comment from the comment box. Your comment will be edited.
WordPress Tutorials: WordPress-Moderate Comments:
In this lesson, we will learn to Moderate Comments in WordPress. Comment moderation is a process where, when visitors comment on posts, the comment is not published directly until and unless it is approved by the admin to be posted. It manages your comments so that there is no comment spamming.
The following steps will show you how to do this.
Step-1: Click on Settings → Discussion in WordPress.
![WordPress Tutorials: WordPress-Moderate Comments — WordPress Tutorials [All in 1] Best Series](https://learncybers.com/api/media/file/9-4.png)
Step-2: The discussion setting page will open.
![WordPress Tutorials: WordPress-Moderate Comments — WordPress Tutorials [All in 1] Best Series](https://learncybers.com/api/media/file/10-4.png)
Step-3: In this box, enter those words or URLs you do not want any visitor to add comments. Whenever a visitor gives any comments it would be moderated by the admin first and then published.
Step (3) − Click on Save Changes.
![WordPress Tutorials: WordPress-Moderate Comments — WordPress Tutorials [All in 1] Best Series](https://learncybers.com/api/media/file/11-5.png)
WordPress Tutorials: WordPress Plugins:
WordPress-View Plugin
Now, We will learn about viewing plugins in WordPress. It helps you to enable and disable WordPress Plugins. This adds unique features to an existing web site. Plugins extend and enlarge the functionality of WordPress.
The following are the simple steps to View Plugins in WordPress.
Step-1: Click on Plugins → Installed Plugins in WordPress administration.
![WordPress-View Plugin — WordPress Tutorials [All in 1] Best Series](https://learncybers.com/api/media/file/01.png)
Step-2: The plugin page will open. All of your plugins will appear here.
![WordPress-View Plugin — WordPress Tutorials [All in 1] Best Series](https://learncybers.com/api/media/file/02.png)
Step-3: A table of Plugin and Description is displayed. Names of the plugins are defined in the Plugin column and a brief description of the plugin is defined under the Description column.
The following options are present in the toolbar on this page.
- All: Shows all of the installed, active and inactive plugins.
- Active: Shows the active plugins on the website.
- Inactive: Shows the installed but inactive plugins on the website.
WordPress Tutorials: WordPress-Install Plugins
Now, we will study how to install plugins in WordPress. It is really easy to install plugins. All the plugins are free to download; the only condition is that a plugin must be in the WordPress directory.
The following are the simple steps to Install Plugins in WordPress.
Step-1: Click on Plugins → Add New in WordPress.
![WordPress Tutorials: WordPress-Install Plugins — WordPress Tutorials [All in 1] Best Series](https://learncybers.com/api/media/file/14-3.png)
Step-2: Enter the name of the required plugin in the search box. A list of plugins that are relevant to the plugins’ name will get displayed.
![WordPress Tutorials: WordPress-Install Plugins — WordPress Tutorials [All in 1] Best Series](https://learncybers.com/api/media/file/15-3.png)
Select the required plugin that you want to install and use. Press the install now button to install the plugin.
Step-3: The plugin will start downloading and then automatically installs it.
![WordPress Tutorials: WordPress-Install Plugins — WordPress Tutorials [All in 1] Best Series](https://learncybers.com/api/media/file/16-3.png)
Step-4: Then press Activate Plugin to activate the plugin. Once the plugin is activated you will view that plugin on the plugin page.
WordPress Tutorials: WordPress-Customize Plugin
Now, we will learn about how to customize WordPress plugins. We don’t need to write any HTML or CSS. This new method allows you to customize your login page by using the WordPress theme customizer (no coding skills required).
The following are the simple steps to Customize Plugins in WordPress.
Step-1: Click on Plugins → Add New.
![WordPress Tutorials: WordPress-Customize Plugin — WordPress Tutorials [All in 1] Best Series](https://learncybers.com/api/media/file/14-3-1024x479.png)
Step-2: Install and activate the Custom Login Page Customizer Plugin. It will help in customizing the plugins.
![WordPress Tutorials: WordPress-Customize Plugin — WordPress Tutorials [All in 1] Best Series](https://learncybers.com/api/media/file/19-1-1024x479.png)
Step-3: After activating the plugin, click on the Appearance → Login Customize section.
![WordPress Tutorials: WordPress-Customize Plugin — WordPress Tutorials [All in 1] Best Series](https://learncybers.com/api/media/file/20-1.png)
Step-4: The customized login page will appear.
![WordPress Tutorials: WordPress-Customize Plugin — WordPress Tutorials [All in 1] Best Series](https://learncybers.com/api/media/file/21.png)
- Logo: Upload the logo of your choice to replace the default WordPress logo.
- Background: Add a background image or you can choose a background color of your choice.
- Form: Select the form background image or color for the login form container of your choice.
Most of the selections in the customizer panel are transparent. You can check all the selections in the customizer to adjust the setting as per the requirement of your login page. Click on Save and Publish button.
WordPress Tutorials: WordPress Users:
WordPress-Users Role
In this lesson, we will learn about the roles of the users in WordPress. In WordPress, every user holds his own roles. Roles are like permissions given to a particular user to access the WordPress site. These roles can be allotted only by the admin.
The few pre-defined roles in WordPress are as follows:
- Administrator: The Administrator has all the rights. An Admin can do anything and everything on the WordPress site such as creating more admins, inviting more users and also removing them. He can also review, edit, publish and delete the pages or posts by other users.
- Editor: The Editor has access to all the posts, pages, comments, categories, tags, and links. They can create, publish, edit or delete any posts or pages.
- Author: The author can only write posts, upload pictures, edit, and publish their own posts.
- Contributor: The Contributor can only write and edit their posts until published. They can create their own posts and pages but cannot publish them. They cannot upload images or files but can see your site’s status. When they want to publish any post, it must be first notified personally to the administrator for review. When the post is approved, the contributor cannot make any changes once published.
- Follower: The Follower can only read and comment on the posts. Followers are the ones who have signed in to your account to receive updates.
- Viewer: Viewers can only view your posts; they cannot edit but can only comment on the posts.
WordPress-Add Users
In this lesson, we will learn how to add users to your WordPress blog or website. When users register on your WordPress blog or website, you get an e-mail notification, so you always know when new users register, and you can then get into your Dashboard and edit the users’ role.
The following are the simple steps to Add Users in WordPress.
Step-1: Click on Users → Add New in WordPress.
![WordPress-Add Users — WordPress Tutorials [All in 1] Best Series](https://learncybers.com/api/media/file/1-5.png)
Step-2: The Add New User page will open. Fill the required fields carefully.
![WordPress-Add Users — WordPress Tutorials [All in 1] Best Series](https://learncybers.com/api/media/file/2-5.png)
Following details will be present in this page:
- Username (required): Enter the unique username, which you want to display on the website.
- E-mail (required): Enter the valid e-mail address. The user receives notifications from the site at this e-mail address.
- First Name: Enter the user’s first name.
- Last Name: Enter the user’s last name.
- Website: Enter the URL for the user’s website.
- Password (required): Enter the password.
- Repeat Password (required): Repeat the same password as the previous password for authentication.
- Send Password: Send password to the New User by e-mail checkbox. The user will receive an e-mail with the new password.
- Role: Select the particular role from the dropdown, i.e., Subscriber, Contributor, Author, Editor, or Administrator.
Then, click on the Add New User button to add a user to your user’s list.
Step-3: You can view the user list to see whether the users have been added. A message will be displayed as New User Created.
![WordPress-Add Users — WordPress Tutorials [All in 1] Best Series](https://learncybers.com/api/media/file/3-3.png)
WordPress Tutorials: WordPress-User Photo
In this lesson, we will study about User Photo in WordPress. To add user photos in WordPress, you must install a plugin WP User Avatar from WordPress plugins. It helps you add a photo of your own to your WordPress profile.
The following are the simple steps to add a User photo.
Step-1: Click on the Users → All User in WordPress.
![WordPress Tutorials: WordPress-User Photo — WordPress Tutorials [All in 1] Best Series](https://learncybers.com/api/media/file/5-3.png)
Step-2: Then select the user whose photo you want to upload.
![WordPress Tutorials: WordPress-User Photo — WordPress Tutorials [All in 1] Best Series](https://learncybers.com/api/media/file/6-4.png)
Step-3: You will see the edit page. There will be the Avatar option at the last of the page.
![WordPress Tutorials: WordPress-User Photo — WordPress Tutorials [All in 1] Best Series](https://learncybers.com/api/media/file/7-5.png)
Step-4: Upload the user’s photo from the media library ( choose from media library only if you have already uploaded earlier) or choose the picture from your device. After uploading the image, press update user to save the changes.
Then you will see a confirmation message of the user updated on the top of the edit page.
You can also change or add your own photo as a wp profile picture.
WordPress Tutorials: WordPress-Edit Users
In this chapter, we will learn about the editing of users in WordPress.
The following are the simple steps to Edit Users in WordPress.
Step-1: Click on Users → All Users.
![WordPress Tutorials: WordPress-Edit Users — WordPress Tutorials [All in 1] Best Series](https://learncybers.com/api/media/file/5-3-1024x475.png)
Step-2: The list of users will open.
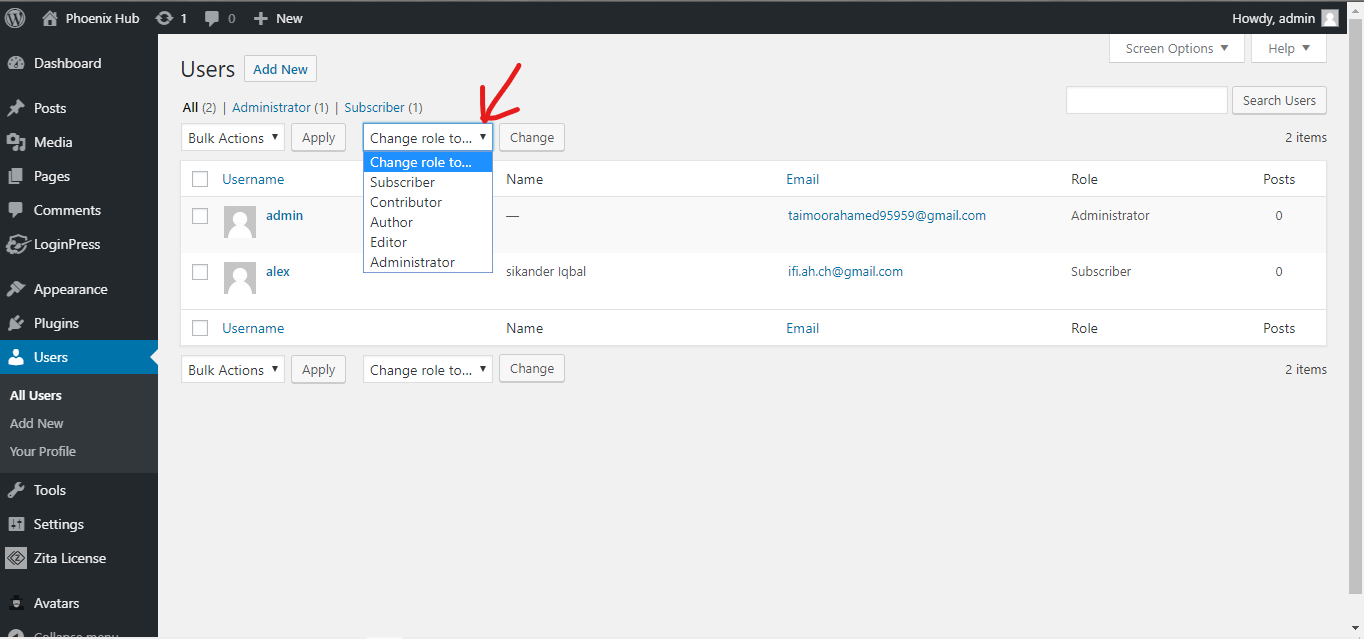
There will be two options in the toolbar. These are:
- Administrator: List of administrators will be displayed.
- Subscriber: List of subscribers will be displayed.
When we click on the change role to… box, the following options will appear:
- Subscriber: A person who can only manage his profile.
- Contributor: A person who can write and supervise own posts, but cannot publish them.
- Author: A person who can publish and manage his own posts.
- Editor: A person who can publish and manage posts, including the posts of other users.
- Administrator: A person who has access to all the administration features within a single website.
Select the role of the user and then press the change button to add the role of the user.
Step-3: Click on users → All Users.
Step-4: The users page will open. Select the user whom you want to edit. Press the edit button. The Eidt page will open.
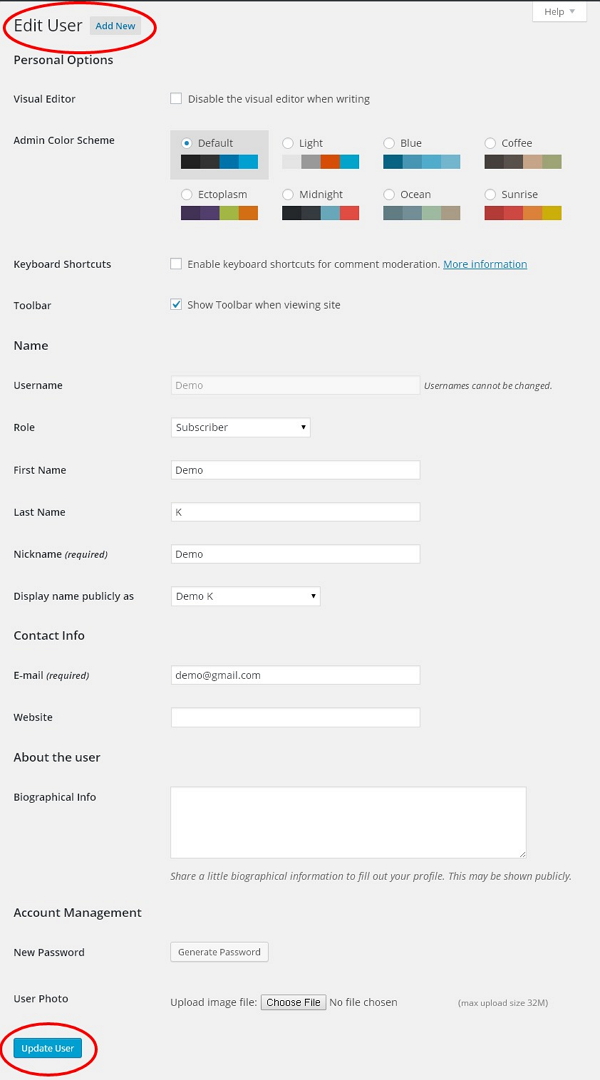
Here you can edit or modify all the fields as per your need and click on Update User to save the changes.
WordPress Tutorials: WordPress-Delete Users
Here, we will learn about how to delete a user in WordPress.
The following are the steps to Delete Users.
Step-1: Click on Users → All Users.
Step-2: The users page will open. Hover over the user whom you want to delete. Certain options will appear. Press Delete one.
![WordPress Tutorials: WordPress-Delete Users — WordPress Tutorials [All in 1] Best Series](https://learncybers.com/api/media/file/8-5-1024x478.png)
Step-2: The following confirmation page will open. Press Confirm Deletion to delete the user.
![WordPress Tutorials: WordPress-Delete Users — WordPress Tutorials [All in 1] Best Series](https://learncybers.com/api/media/file/9-5.png)
Step-3: The user will be deleted. The following confirmation message will appear.
![WordPress Tutorials: WordPress-Delete Users — WordPress Tutorials [All in 1] Best Series](https://learncybers.com/api/media/file/10-5.png)
Step-4: We have another method of deleting the user. Click on the encircled box as shown below. There will be an option of delete. Select it. Select the user whom you want to delete. Then press Apply to delete that user or users.
![WordPress Tutorials: WordPress-Delete Users — WordPress Tutorials [All in 1] Best Series](https://learncybers.com/api/media/file/11-6.png)
Step-5: Again the confirmation screen will appear. Press confirm deletion to delete that user.
![WordPress Tutorials: WordPress-Delete Users — WordPress Tutorials [All in 1] Best Series](https://learncybers.com/api/media/file/9-5-1024x477.png)
Step-6: The user will be deleted.
![WordPress Tutorials: WordPress-Delete Users — WordPress Tutorials [All in 1] Best Series](https://learncybers.com/api/media/file/10-5-1024x478.png)
WordPress Tutorials: WordPress-Personal Profile
Now, we will learn how to create a Personal profile in WordPress.
The following are the steps to Personal Profile.
Step-1: Click on Users → Your Profile.
![WordPress Tutorials: WordPress-Personal Profile — WordPress Tutorials [All in 1] Best Series](https://learncybers.com/api/media/file/12-3.png)
Step-2: The following screen will open.
![WordPress Tutorials: WordPress-Personal Profile — WordPress Tutorials [All in 1] Best Series](https://learncybers.com/api/media/file/13.jpg)
The following details will be given on this page:
- Visual editor: While adding posts/pages to your site you can enable this setting if you wish to create, format, or edit your post. If these settings are disabled, you won’t be able to use this option.
- Admin color scheme: You can change the color of your WordPress site by selecting any of the following.
- Keyboard Shortcuts: If you are too fast at getting your work done and need keyboard shortcuts then you can check this box.
- Toolbar: If you check this box, you can view the toolbar while using WordPress.
Name
- Username: Enter your user name.
- First Name/ Last Name: Enter your first name and last name.
- Nickname: Enter nicknames if any.
- Display name publicly as: Check the box if you want your name to be displayed publicly.
Contact Info
- E-mail: Enter a valid e-mail address.
- Website: Type in your web address.
About yourself
- Biographical Info: Some details about you.
- New password: Enter a password of your choice.
- Repeat password: Re-enter the password for authentication. The password must contain 7 characters.
- Your photo: You can upload an image of your own from your computer. This will be your profile picture.
Step-3: After you have updated all the changes, click on Update Profile.
WordPress Tutorials: WordPress Appearance:
WordPress-Theme Management:
Now, it is time to learn about Theme management. It includes image files, templates, CSS stylesheets, etc. that can help to make your website look great. This chapter discusses how to install, add new, or customize themes in WordPress.
The following are the steps for Theme Management.
Step (1) − Select Appearance → Themes
![WordPress-Theme Management — WordPress Tutorials [All in 1] Best Series](https://learncybers.com/api/media/file/13-3.png)
Step-2: The theme page will open. Hover over any of the themes that you want to use. Then press Theme Details to see its details.
![WordPress-Theme Management — WordPress Tutorials [All in 1] Best Series](https://learncybers.com/api/media/file/14-4.png)
Step-3: The following page will open. It consists of details related to the theme. Details like version, description, tags, etc.
![WordPress-Theme Management — WordPress Tutorials [All in 1] Best Series](https://learncybers.com/api/media/file/15-4.png)
If you want to add this theme to your page/website then click on Activate, and if you want to just check the theme, then click on Live Preview.
If you press activate, then following screen will appear.
![WordPress-Theme Management — WordPress Tutorials [All in 1] Best Series](https://learncybers.com/api/media/file/16-4.png)
Step-4: Press customize option. The following screen will open.
![WordPress-Theme Management — WordPress Tutorials [All in 1] Best Series](https://learncybers.com/api/media/file/18-2-1024x476.png)
Step-5: On the left side of the page, you can customize your theme. Any changes you make or anything new you add is displayed on the right side of the page.
We will learn about customizing themes in the very next chapter.
WordPress Tutorials: WordPress-Customize Theme
Here, we will learn how to customize themes. Customizing themes help you to give a new look to your website. Here you can change background images/colors, add titles, and do much more.
The following are the steps to Customize theme.
Step (1) − Click on Appearance → Customize.
![WordPress Tutorials: WordPress-Customize Theme — WordPress Tutorials [All in 1] Best Series](https://learncybers.com/api/media/file/1-6-1024x476.png)
Step-2: The following screen will open.
![WordPress Tutorials: WordPress-Customize Theme — WordPress Tutorials [All in 1] Best Series](https://learncybers.com/api/media/file/2-6.png)
On the left side, we have the customizing section, and on the right side, we have the theme you have chosen. So any changes you make on the left side will be displayed on the right side of the page.
The following are the details of options given in the left panel:
Active theme: In this section, you can change the current theme just by clicking on ‘Change’. The following page will open after pressing the change option.
![WordPress Tutorials: WordPress-Customize Theme — WordPress Tutorials [All in 1] Best Series](https://learncybers.com/api/media/file/3-4.png)
There will be two options in the left box. These are:
- Installed Themes: Pressing this will open the themes that you have already installed.
- WordPress.org themes: Pressing this will open directly the page of themes on the WordPress website. Here you could install new themes and then Select that one to continue customizing.
Site Identity: In this section, you can add the site title and tagline you want to add to your website.
![WordPress Tutorials: WordPress-Customize Theme — WordPress Tutorials [All in 1] Best Series](https://learncybers.com/api/media/file/4-4.png)
Add your title name in the ‘Site Title’ section. And your tagline in the ‘Tagline’ box.
Login Customizer: You can also customize your website login page using this option. Press this will open the following page. Fill the required fields according to your own needs.
![WordPress Tutorials: WordPress-Customize Theme — WordPress Tutorials [All in 1] Best Series](https://learncybers.com/api/media/file/7-6.png)
Login Press: You can also customize your website’s login page using the login press option. The following page will open. Fill in the fields according to your own needs.
![WordPress Tutorials: WordPress-Customize Theme — WordPress Tutorials [All in 1] Best Series](https://learncybers.com/api/media/file/8-6.png)
Colors − You can change your header text color using this section. You can even add a color of your own into the box by choosing the custom option. As you scroll through the colors you find changes happening on the right side of your page.
![WordPress Tutorials: WordPress-Customize Theme — WordPress Tutorials [All in 1] Best Series](https://learncybers.com/api/media/file/5-4.png)
The following page will open after selecting custom. Select the color of your choice and then go back.
![WordPress Tutorials: WordPress-Customize Theme — WordPress Tutorials [All in 1] Best Series](https://learncybers.com/api/media/file/6-5.png)
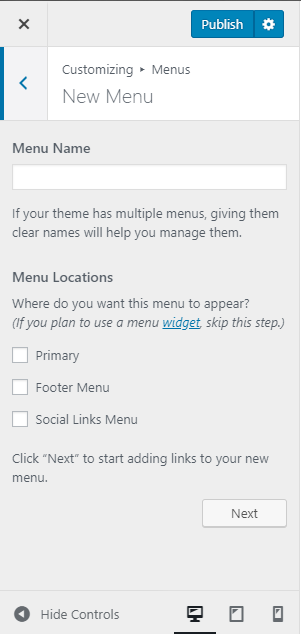
Menus: You can also add and create different menus for your web page. Press Create New Menu to create a new one.
![WordPress Tutorials: WordPress-Customize Theme — WordPress Tutorials [All in 1] Best Series](https://learncybers.com/api/media/file/9-6.png)
The following screen will open. Write the name of the menu. Select its location on the page. Then press next. The Menu will be created. After editing it, press the arrow button to go back.
Widgets: Add widgets to your site from here.
![WordPress Tutorials: WordPress-Customize Theme — WordPress Tutorials [All in 1] Best Series](https://learncybers.com/api/media/file/10-6.png)
These are the widgets that will be displayed in the footer area. There will be an Add a Widget button. You can also add a widget by pressing this button. Select any of the widget shown.
![WordPress Tutorials: WordPress-Customize Theme — WordPress Tutorials [All in 1] Best Series](https://learncybers.com/api/media/file/11-7.png)
After filling the required information, press Done to add that widget.
![WordPress Tutorials: WordPress-Customize Theme — WordPress Tutorials [All in 1] Best Series](https://learncybers.com/api/media/file/12-4.png)
Homepage setting: Select either the latest posts or static front page for your site.
![WordPress Tutorials: WordPress-Customize Theme — WordPress Tutorials [All in 1] Best Series](https://learncybers.com/api/media/file/image-4.png)
WordPress-Widget Management
In this lesson, we will study about Widget Management. Widgets are small blocks that perform specific functions. These give design and structure control to the WordPress theme. Some specific features of widgets are:
- They help you add content and features.
- They can be easily dragged and dropped in the widget area.
- They vary from theme to theme. They are not the same for every theme.
Step-1: Click on Appearance → Widgets.
![WordPress-Widget Management — WordPress Tutorials [All in 1] Best Series](https://learncybers.com/api/media/file/1-7.png)
Step-2: The following page will open.
![WordPress-Widget Management — WordPress Tutorials [All in 1] Best Series](https://learncybers.com/api/media/file/2-7.png)
The following options will be available on this page:
- Available Widgets: You can use these to add to your footer.
- Inactive Widgets: Drag widget here to remove it from the sidebar but keep its settings or press the clear inactive widget to delete it.
- Footer: Drag any widget here to add in this box. Any widget you add here will appear on your site’s footer.
- Manage in the live preview: Takes you back to the customization page where you can manage the widgets with the live preview.
WordPress Tutorials: WordPress Advanced:
WordPress-Hosting
In this chapter, we will study how to transfer WordPress to a new hosting platform. We have used Hostinger web hosting to transfer the WordPress site to another host.
Just follow the simple steps given below to transfer your WordPress site to another host.
Step-1: Keep the backup of WordPress files and export the database. We will study this in detail soon.
Step-2: Login to your cPanel and click on MySQL Databases.
![WordPress-Hosting — WordPress Tutorials [All in 1] Best Series](https://learncybers.com/api/media/file/1-1.jpg)
Step-3: Create a new database and MySQL user.
![WordPress-Hosting — WordPress Tutorials [All in 1] Best Series](https://learncybers.com/api/media/file/2.jpg)
The following details will be given on this page:
- MySQL Database Name: Enter your database name.
- MySQL Username: Enter your username.
- Password: Set a password for your database.
- Password again: Once again set the same password as previous for authentication.
After filling all the fields, click on the Create button.
Step-4: You can view your created MySQL database, User and Host.
![WordPress-Hosting — WordPress Tutorials [All in 1] Best Series](https://learncybers.com/api/media/file/3.jpg)
Step-5: Click on plus [ + ] symbol.
![WordPress-Hosting — WordPress Tutorials [All in 1] Best Series](https://learncybers.com/api/media/file/4.jpg)
Step-6: Click on phpMyAdmin.
![WordPress-Hosting — WordPress Tutorials [All in 1] Best Series](https://learncybers.com/api/media/file/5.jpg)
Step-7: Click on the Import Tab on the phpMyAdmin page.
![WordPress-Hosting — WordPress Tutorials [All in 1] Best Series](https://learncybers.com/api/media/file/6.jpg)
Step-8: Click on the Choose File button to select the backup file from your system and click on the Go button.
![WordPress-Hosting — WordPress Tutorials [All in 1] Best Series](https://learncybers.com/api/media/file/7.jpg)
Step-9: You can view the tables of the database uploaded.
![WordPress-Hosting — WordPress Tutorials [All in 1] Best Series](https://learncybers.com/api/media/file/8.jpg)
Step-10: Upload your WordPress files by using file transfer protocol(FileZilla).We will learn about it in chapter WordPress-Backup&Restore.
Step-11: Edit wp-config.php file as mentioned in the Restoring WordPress Files section in chapter WordPress – Backup & Restore.
Step-12: Inside the Website section of hostinger, Click on Auto Installer.
![WordPress-Hosting — WordPress Tutorials [All in 1] Best Series](https://learncybers.com/api/media/file/9.jpg)
Step-13: You can view the uploaded file of WordPress. Click on the URL link.
![WordPress-Hosting — WordPress Tutorials [All in 1] Best Series](https://learncybers.com/api/media/file/10.jpg)
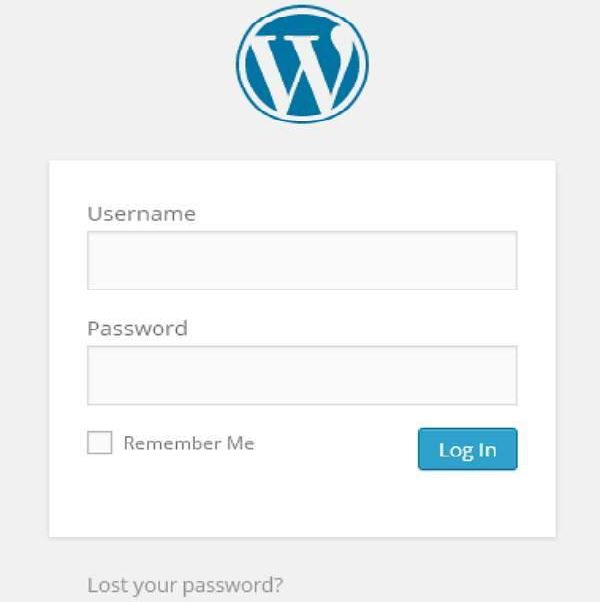
Step-14: You can view the login page of WordPress.
WordPress Tutorials: WordPress-Version Update
In this lesson, we will study how to update the version in WordPress. Here, we will upgrade WordPress to the latest version through the admin panel.
The following are a few simple steps to update the version in WordPress.
Step-1: Click on Please Update Now.
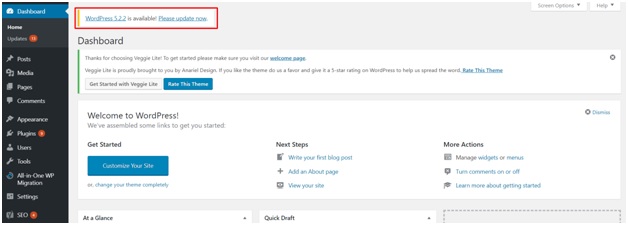
Step-2: After pressing the link, the following page will open. Press update now button.
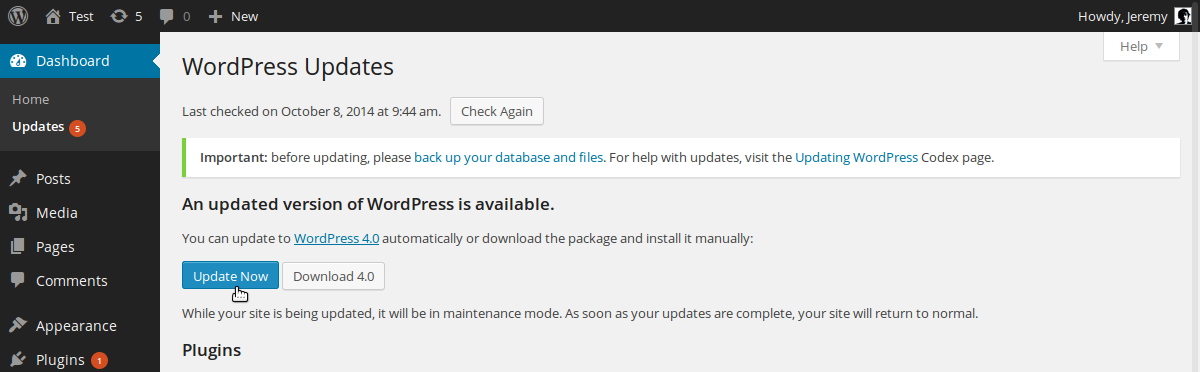
Step-3: The following screen will open during the update of WordPress.
![WordPress Tutorials: WordPress-Version Update — WordPress Tutorials [All in 1] Best Series](https://learncybers.com/api/media/file/1-2.jpg)
Please Note: While updating the version, if you get an error as:
Fatal error: Maximum execution time of 30 seconds exceeded in C:\your wordpress folder\wp-includes\class-http.php on line 1597
Then you need to take the following actions:
- Open your WordPress folder → wp-includes folder
- Open the class-http.php file and add the following line at the beginning − set_time_limit (0);
- Save the file.
Now your WordPress is successfully upgraded.
WordPress Tutorials: WordPress-Spam Protection
In this lesson, we will learn how to protect your WordPress blog or website from spam. Make sure that your WordPress script is updated to the latest stable version. WordPress comes with a preinstalled antispam solution – Akismet.
You can activate Akismet, for which you should have a WordPress API key. You have to register at the official WordPress website. The key will be sent to your mailbox.
The following are the steps to follow to enable Akismet Spam Protection plugin for your website or blog.
Step-1: Go to your WordPress admin area → Plugins → Installed.
![WordPress Tutorials: WordPress-Spam Protection — WordPress Tutorials [All in 1] Best Series](https://learncybers.com/api/media/file/01-1024x482.png)
Step-2: Click on the Activate button.
![WordPress Tutorials: WordPress-Spam Protection — WordPress Tutorials [All in 1] Best Series](https://learncybers.com/api/media/file/2-1.jpg)
Step-3: The Akismet plugin will be activated and then Click on Activate your Akismet account button.
![WordPress Tutorials: WordPress-Spam Protection — WordPress Tutorials [All in 1] Best Series](https://learncybers.com/api/media/file/3-1.jpg)
Step-4: Click on Get your API key as seen in the following screen to get a new key or enter manually, if you already have the API key.
![WordPress Tutorials: WordPress-Spam Protection — WordPress Tutorials [All in 1] Best Series](https://learncybers.com/api/media/file/4-1.jpg)
Step-5: If you don’t have an API key then, click on GET AN AKISMET API KEY tab to move further. The following page will open then.
![WordPress Tutorials: WordPress-Spam Protection — WordPress Tutorials [All in 1] Best Series](https://learncybers.com/api/media/file/5-1.jpg)
Step-6: Fill up the required fields and click on the Sign-up button.
![WordPress Tutorials: WordPress-Spam Protection — WordPress Tutorials [All in 1] Best Series](https://learncybers.com/api/media/file/6-1.jpg)
Then you will get your API key. Copy it and click on automatically save your AVI key. The following page will open after clicking the save button.
![WordPress Tutorials: WordPress-Spam Protection — WordPress Tutorials [All in 1] Best Series](https://learncybers.com/api/media/file/8-1-1024x477.jpg)
Step-9: Now your blog will be protected from spam by Akismet. You will be able to check the comments in your blog for spam, as well as manually mark comments. You can keep a track of how many spam posts have been stopped by Akismet and you can secure your posts, blogs, comments, etc. Furthermore, you can prevent your website from spammers, who can harm your site.
WordPress Tutorials: WordPress-Backup&Restore
In this lesson, we will study how to Backup & Restore files and databases in WordPress. In WordPress, there are two parts of backing up such as:
- WordPress Files Backup
- WordPress Database Backup
- WordPress Files Restore
- WordPress Database Restore
WordPress Files Backup
To get the backup files of WordPress, you need to install FileZilla Client on your system.
Following are the simple steps used for files backup operation in WordPress:
Step-1: Open the FileZilla Client.
![WordPress Files Backup — WordPress Tutorials [All in 1] Best Series](https://learncybers.com/api/media/file/9-1.jpg)
Step-2: Enter the Host, Username, Password, and Port-like you have used to log-in to your cPanel.
![WordPress Files Backup — WordPress Tutorials [All in 1] Best Series](https://learncybers.com/api/media/file/10-1.jpg)
After filling all the fields, click on the Quickconnect button.
Step-3: You will get all files and folders of your WordPress site on the right side.
![WordPress Files Backup — WordPress Tutorials [All in 1] Best Series](https://learncybers.com/api/media/file/11.jpg)
Step-4: Select all the files and folders and right-click on the mouse and click on Download.
![WordPress Files Backup — WordPress Tutorials [All in 1] Best Series](https://learncybers.com/api/media/file/12.jpg)
After downloading the WordPress files from cPanel, it will be saved on your system.
WordPress Tutorials: WordPress Database Backup
Following are the simple steps for database backup in WordPress:
Step-1: Type the path http://localhost/phpmyadmin in your browser. You will get the following screen.
![WordPress Tutorials: WordPress Database Backup — WordPress Tutorials [All in 1] Best Series](https://learncybers.com/api/media/file/13-1.jpg)
Step-2: Click on the database name ‘WordPress’ which you have created for WordPress.
![WordPress Tutorials: WordPress Database Backup — WordPress Tutorials [All in 1] Best Series](https://learncybers.com/api/media/file/14.jpg)
Step-3: After clicking on the database WordPress, it will open the following page. Click on the Export tab.
![WordPress Tutorials: WordPress Database Backup — WordPress Tutorials [All in 1] Best Series](https://learncybers.com/api/media/file/15.jpg)
Step-4: You will get two methods to export the database i.e. Quick and Custom. Select any one of the methods and click on the Go button.
![WordPress Tutorials: WordPress Database Backup — WordPress Tutorials [All in 1] Best Series](https://learncybers.com/api/media/file/16.jpg)
After exporting the database file, it will get saved on your system.
Restoring WordPress Files
Following are the simple steps used to restore the files in WordPress using FTP:
Step-1: Open the FileZilla Client and log in to your site using FTP.
![Restoring WordPress Files — WordPress Tutorials [All in 1] Best Series](https://learncybers.com/api/media/file/17.jpg)
Step-2: Open the local directory in FTP and upload all WordPress files to your website.
![Restoring WordPress Files — WordPress Tutorials [All in 1] Best Series](https://learncybers.com/api/media/file/18.jpg)
Step-3: Then, go to your WordPress folder → wp-config.php file. Copy and rename the wp-config.php file before editing, in case of some mistake you can restore this file back.
Open the wp-config.php file and locate the following code.
define('DB_NAME', 'db_name');Replace the db_name with your database name which you have created.
define('DB_USER', 'db_user');Replace the db_user with your username of MySql.
define('DB_PASSWORD', 'db_password');Replace the db_password with your password of MySql.
Save your wp-config file after editing and upload it to your WordPress site through FTP.
Restoring WordPress Database
Following are the steps used to restore the database in WordPress −
Step-1: Type the path http://localhost/phpmyadmin in the browser.
![Restoring WordPress Database — WordPress Tutorials [All in 1] Best Series](https://learncybers.com/api/media/file/19.jpg)
You can create a new database or import your backup in the existing database.
Here we’ll create a new database name, i.e., new_wordpress and click on Create button.
Step-2: You can view your created database as shown in the following screen. Click on the database name new_wordpress.
![Restoring WordPress Database — WordPress Tutorials [All in 1] Best Series](https://learncybers.com/api/media/file/20.jpg)
Step-3: Click on import.
![Restoring WordPress Database — WordPress Tutorials [All in 1] Best Series](https://learncybers.com/api/media/file/21.jpg)
Step-4: Click on the Choose File button to select the backup file from your system. After uploading the SQL file, select format as SQL.
![Restoring WordPress Database — WordPress Tutorials [All in 1] Best Series](https://learncybers.com/api/media/file/22-1.jpg)
Click on the Go button.
Step-5: Once you click on Go, you will get a message after the SQL file is uploaded successfully.
![Restoring WordPress Database — WordPress Tutorials [All in 1] Best Series](https://learncybers.com/api/media/file/23.jpg)
WordPress Tutorials: WordPress-Optimization
In this lesson, we will learn about how to optimize a WordPress site.
The following are a few simple tips to optimize your WordPress site:
- Have the right names for images.
- Use short permalinks that contain keywords.
- Connect posts to social networks.
- Ensure high quality and meaningful content.
- Delete your trash box.
- Keep Checking The Statistics of Your Site.
- The sitemap should be in XML format.
- Keep checking your plugins.
- Use CSS and JavaScript effectively.
- Have optimized themes.
- Beware of black hat techniques.
Have the right names for images:
Choose unique names for the images; consider choosing images keeping the user in mind. Use keywords that might be helpful for the users. Your images must have specific names and don’t forget to add your alternative tags and title tags to your images.
For example: If your image is about icecream chocolate shake then do not mention the name as Ish6514, instead of it, put it as ‘ Chocolate-Icecream-Shake-Shakes-Restuarant-Ohio.jpg’. This would be much easier to search for.
Use short permalinks that contains keywords:
The permalink that you use for your website must be unique, short and understandable. For example: Always use ” http://www.mywebsite.com/wordpress-tutorials/” instead of “www.mywebsite.com/page-id?5631456325/”.
Connect posts to social networks:
Today, social media is a very good aspect. So have them connected to your blog posts, pages, etc., to have good ranks and popularity. Help promote other posts and pages too and they will do the same in return.
Ensure high quality and meaningful content:
The most important thing that matters in any of your pages is the content. You must have good content with keywords that can be helpful for users, not for the search engines. Content should be understandable and not complicated or difficult to read.
Delete your trash box:
For more speed and to have a good flow with your website, always consider cleaning your trash box.
Keep checking the statistics of your site:
The size of the page matters a lot. The more images, flash, videos or media related posts on your page, the more it would be slower to load. Yslowi> module plugin is recommended to help you get a faster page browsing.
The sitemap should be in XML formate:
Google has many tools that can be useful. Tools like Website Optimizer, Webmaster Central, and Google XML sitemaps are very easy to use.
Keep checking your plugins:
Having many plugins in WordPress may also be the reason for your page to slow load. So keep a check on your plugins which you’re working on. Consider checking your plugins before you add them.
Use CSS and JavaScript effectively:
Always keep your CSS at the upper side of the page and JavaScript at the bottom. Let CSS load first and then JavaScript. Here is a plugin that will help you get your JavaScript at the bottom of the page. It is Footer javaScript.
Have optimized themes:
Always use those themes that are fast and are optimized for WordPress so that when applied to a website, it must not have low speed.
Beware of black hat techniques:
Don’t trick Google as it finds you in no time. Don’t put yourself in trouble and create problems for your site by using black hat techniques. Be sure to use genuine SEO techniques.
WordPress Tutorials: WordPress-Reset Password
Now, we will learn how to reset passwords in WordPress. We have two methods of resetting passwords in WordPress −
- User
- Lost your password
Let’s look at how to set passwords through the User section.
Step-1: Login to your WordPress admin panel and click on Users → All Users from the dashboard.
![WordPress Tutorials: WordPress-Reset Password — WordPress Tutorials [All in 1] Best Series](https://learncybers.com/api/media/file/1-3.jpg)
Step-2: Here, select the one you want to reset the password of and click on edit.
![WordPress Tutorials: WordPress-Reset Password — WordPress Tutorials [All in 1] Best Series](https://learncybers.com/api/media/file/2-2.jpg)
Step-3: The edit page will open if you click the edit option. Scroll down and you will find the following block i.e Account Management.
![WordPress Tutorials: WordPress-Reset Password — WordPress Tutorials [All in 1] Best Series](https://learncybers.com/api/media/file/3-2.jpg)
Step-4: Press the Generate Password button, write the new password and then press the Update profile button to save.
Now let’s look into resetting your password using Lost your password section.
Step-5: In this page, you can type in your new password that must contain 7 characters. Once you are done with setting your new password click on Update Profile.
Step-5.1: When you try logging into your WordPress admin panel, you forget your password and need to reset it, you get the following message on the page.
![WordPress Tutorials: WordPress-Reset Password — WordPress Tutorials [All in 1] Best Series](https://learncybers.com/api/media/file/4-5.png)
Step-5.2: Click on Lost your password? The following page appears. Update your e-mail and say Get New Password.
![WordPress Tutorials: WordPress-Reset Password — WordPress Tutorials [All in 1] Best Series](https://learncybers.com/api/media/file/5-2.jpg)
Step-5.3: After you click, you get a message saying a Link has been sent to the e-mail address you provided.
Step-5.4: Go to your e-mail and open the (WordPress Site) Password Reset mail and click on the link that is provided.
Step-5.5: Type your new password, confirm again if required and then click on Reset Password.